Learning how to remove iron from car paint starts with identifying embedded metallic contamination and using the right decontamination products to remove it safely. Iron particles from brake dust, rail dust, and industrial fallout can settle on your vehicle’s exterior, bond to the clear coat, and eventually appear as tiny orange or brown specks. Regular car washing may remove loose dirt, but it often cannot eliminate these embedded particles completely.
The most effective approach is to wash the vehicle thoroughly, apply a dedicated iron fallout remover formulated for automotive paint, and rinse away the dissolved contamination according to the product instructions. If the paint still feels rough afterward, a clay bar treatment may help remove other bonded contaminants that remain on the surface. Proper decontamination helps restore a smoother finish and prepares the paint for polishing, waxing, or ceramic protection.
In this guide, you will learn how to remove iron from car paint step by step, recognize the signs of iron contamination, choose the right products, and avoid common mistakes that could damage your vehicle’s finish.
What Is Iron Contamination on Car Paint?
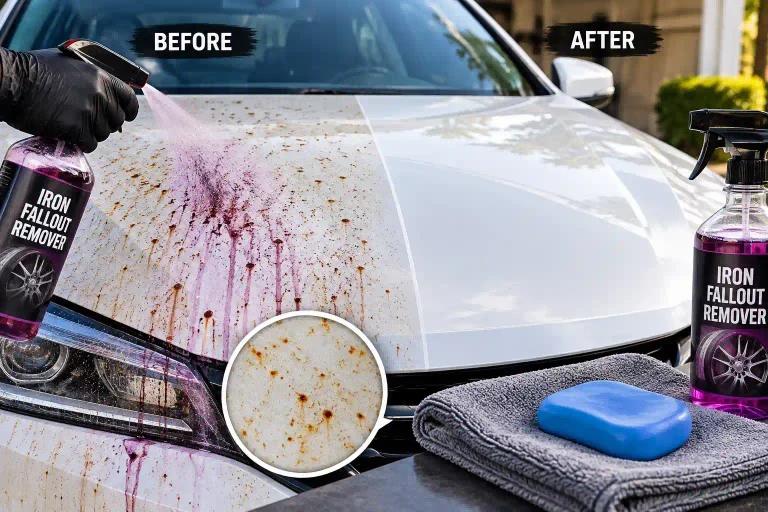
Iron contamination occurs when tiny iron-containing particles settle on a vehicle’s exterior and become bonded to the paint surface. These particles commonly originate from brake dust, railway operations, industrial activities, and other sources of airborne metallic debris.
Although the particles may initially be difficult to see, they can become more noticeable as they oxidize and develop orange or brown spots. They can also make freshly washed paint feel rough instead of smooth.
Rail dust is a specific type of metallic contamination associated with railway operations. Industrial fallout is a broader term that includes airborne particles from industrial environments, some of which contain iron.
Iron contamination commonly accumulates on horizontal surfaces, lower body panels, and areas exposed to airborne debris. However, it can affect almost any exterior painted panel.
Ordinary car shampoo removes loose dirt and grime, but bonded iron particles may require a specialized chemical treatment. Identifying the contamination before choosing a cleaning method helps prevent unnecessary scrubbing and potential paint damage.
How to Tell If Your Car Paint Has Iron Contamination
Before purchasing an iron remover, inspect your vehicle for signs of embedded metallic particles.
Common indicators include:
- Orange or brown specks on the paint, especially visible on white and other light-colored vehicles.
- A rough or gritty texture after the vehicle has been washed and dried.
- Small spots that remain visible after normal washing.
- Persistent contamination on body panels exposed to brake dust, rail dust, or industrial fallout.
Visual inspection alone cannot confirm that every spot contains iron. Road tar, tree sap, paint defects, and other contaminants may look similar, so avoid assuming that every brown or black mark requires an iron remover.
If the paint appears clean but still feels rough, an iron remover designed for automotive surfaces can help determine whether metallic contamination is present. Some products change color, often to purple or red, when they react with iron particles.
What You Need to Remove Iron from Car Paint
Prepare the necessary supplies before starting the decontamination process.
- A pH-neutral automotive shampoo and a suitable wash mitt.
- A hose or pressure washer for thorough rinsing.
- A dedicated iron fallout remover labeled safe for your vehicle’s paint.
- Protective gloves and any additional protective equipment specified on the product label.
- Clean microfiber towels for drying and inspection.
- A compatible clay bar and clay lubricant, if additional mechanical decontamination is necessary.
- A suitable car wax, paint sealant, or ceramic protection product for the final step.
Choose an iron remover specifically intended for automotive paint. Not every chemical cleaner is compatible with every surface, and products designed for wheels or other materials may have different application requirements.
How to Remove Iron from Car Paint Step by Step
The following process removes iron contamination while minimizing unnecessary contact with the paint.
Step 1: Wash the Vehicle Thoroughly
Begin by washing your vehicle with automotive shampoo and clean water. Remove loose dirt, road grime, and other surface debris before applying an iron remover.
This step is important because loose particles can interfere with the treatment and create a risk of scratching if they are rubbed against the paint.
Wash the vehicle from the upper panels downward, using a clean wash mitt and appropriate washing technique. Rinse thoroughly to remove shampoo and loosened debris.
Once the wash is complete, follow the iron remover manufacturer’s instructions regarding whether the product should be applied to wet or dry paint.
Step 2: Move the Vehicle Into a Shaded Area
Work on cool paint in a well-ventilated area, away from direct sunlight. Hot panels can cause some products to dry too quickly, increasing the risk of residue, streaking, or staining.
Before applying the product, read the label carefully. Check the recommended surfaces, application method, safety precautions, and required dwell time.
Wear the specified protective equipment and test the product on an inconspicuous area when appropriate, especially if the paint condition or finish is uncertain.
Step 3: Apply an Iron Fallout Remover
Spray a suitable iron fallout remover evenly onto the affected painted panels, following the manufacturer’s application instructions.
Work on manageable sections instead of treating the entire vehicle at once. This gives you better control over the product’s reaction time and makes it easier to rinse each panel before the cleaner dries.
Pay attention to visibly contaminated areas, but do not assume that only the orange or brown spots contain iron. Some metallic particles are too small to see clearly.
Do not use a household rust remover or an unverified chemical substitute. Automotive iron removers are formulated for specific vehicle-care applications, and compatibility depends on the product.
Step 4: Allow the Product to React With the Iron Particles
Let the iron remover work for the time specified on its label. Depending on the formulation, this may take a few minutes.
Some iron removers produce a purple or reddish color change as they react with iron contamination. This visible reaction can indicate that the product has contacted metallic particles on the surface.
However, not every formula reacts identically, and the intensity of the color is not a reliable measurement of how much contamination remains.
Never allow the product to dry on the paint. If it begins drying before the recommended dwell time is complete, rinse it off promptly according to the product instructions rather than waiting for the full time to elapse.
Avoid aggressive scrubbing during the reaction. If additional agitation is permitted by the manufacturer, use an appropriate soft cleaning tool with light pressure.
Step 5: Rinse the Paint Thoroughly
After the recommended dwell time, rinse the treated panels thoroughly with clean water.
Pay particular attention to panel gaps, badges, trim edges, and other areas where chemical residue might collect. Make sure the product has been removed before allowing the surface to dry.
Inspect the paint once the vehicle has been rinsed. If the product has removed the iron contamination successfully, many of the visible metallic specks should be reduced or eliminated.
Some orange spots may remain because they are not iron contamination, or because oxidation has already affected the finish. Persistent marks should not automatically be treated with a more aggressive chemical or additional scrubbing.
If necessary, repeat the process only when the product instructions permit it.
Step 6: Check Whether a Clay Bar Treatment Is Necessary
After chemical decontamination, inspect the clean paint to determine whether additional treatment is needed.
If the surface still feels rough, other bonded contaminants may remain. These can include industrial deposits, overspray, and other particles that an iron remover is not designed to remove.
A clay bar or clay mitt can help remove these remaining contaminants through mechanical action. Use a product-compatible clay lubricant, work in small sections, and apply only light pressure.
Keep the surface adequately lubricated throughout the process. Never drag clay across dry paint, and knead a traditional clay bar as directed to expose a clean working surface. If the clay becomes heavily contaminated or falls onto the ground, follow the manufacturer’s guidance for cleaning or replacement.
Claying can introduce fine marring, particularly on soft or dark-colored paint. It is therefore best used when inspection indicates that it is actually necessary rather than automatically included in every iron-removal treatment.
Step 7: Dry and Inspect the Paint
After completing the required decontamination, rinse away any remaining residue and dry the vehicle with a clean, soft microfiber drying towel.
Inspect the paint in good lighting. Look for remaining orange specks, rough areas, visible scratches, and other defects that were previously hidden by dirt or contamination.
If the surface is smooth and the finish looks clean, additional correction may not be necessary.
If staining or marks remain, identify the cause before proceeding. Paint polishing may improve certain surface defects, but deeper etching, damaged clear coat, or corrosion may require professional assessment.
Step 8: Protect the Clean Paint
Once the paint is properly cleaned and dry, apply a compatible protective product if appropriate for your vehicle’s finish.
A car wax or paint sealant can provide a protective layer and make routine cleaning easier. A compatible ceramic coating may also be an option if you want a different type of paint protection.
Follow the chosen product’s preparation and application instructions. If you plan to apply a ceramic coating, check its requirements carefully because it may require a particular surface preparation process.
Protection does not make the paint immune to iron contamination, but regular washing and appropriate maintenance can help keep the finish in better condition between decontamination treatments.
How Often Should You Remove Iron from Car Paint?
There is no single decontamination schedule that suits every vehicle. The right interval depends on the amount of metallic contamination in your environment, how frequently you drive, where you park, and the condition of your existing paint protection.
Vehicles regularly exposed to railway areas, industrial environments, heavy traffic, or substantial brake dust may require more frequent inspection than vehicles driven in cleaner environments.
Instead of automatically applying an iron remover every few weeks, inspect the paint periodically after washing. Look for persistent metallic specks and assess whether the surface remains rough.
Use chemical decontamination when necessary, follow the product’s instructions, and avoid unnecessary repeated treatments. Routine washing should remain the foundation of your maintenance schedule.
Common Mistakes to Avoid When Removing Iron from Car Paint
Removing iron contamination is generally straightforward when you use the correct product, but several mistakes can compromise the results.
- Applying iron remover to hot paint or allowing it to dry before rinsing.
- Using a general-purpose rust remover that is not intended for automotive paint.
- Ignoring the manufacturer’s recommended dwell time and safety precautions.
- Scrubbing aggressively to remove spots that may be paint defects rather than iron particles.
- Using a clay bar without sufficient lubrication.
- Assuming that every orange or brown mark contains iron.
- Applying wax or another protective product before removing the chemical residue.
- Repeating chemical treatments unnecessarily when the paint is already clean.
Working methodically and identifying the type of contamination before treating it can help prevent unnecessary chemical exposure and mechanical abrasion.
Frequently Asked Questions
Can regular car shampoo remove iron from car paint?
Regular car shampoo can remove loose dirt and some surface contamination, but it may not remove iron particles that have bonded to the paint. A dedicated iron fallout remover is designed to chemically address this type of contamination.
What causes orange spots on car paint?
Orange spots can be caused by iron-containing particles that have oxidized on the paint surface. However, other contaminants and paint defects can look similar, so inspect the affected area before selecting a treatment.
Does an iron remover damage car paint?
An iron remover formulated for compatible automotive paint can generally be used according to its instructions. However, incorrect application, unsuitable surfaces, excessive dwell time, or allowing the product to dry can cause problems. Always follow the label and avoid using the product on incompatible finishes.
Does an iron remover remove rust permanently?
An iron remover can dissolve compatible iron contamination on the surface, but it cannot necessarily repair rust-related etching or damage that has already affected the paint. If discoloration remains after proper decontamination, further inspection may be necessary.
Should I use a clay bar after an iron remover?
Only when needed. An iron remover addresses iron contamination chemically, whereas a clay bar can remove certain remaining bonded contaminants mechanically. If the paint is already smooth after chemical treatment, claying may be unnecessary.
Can I remove rail dust from a white car without damaging the paint?
Yes, a suitable automotive iron remover can help remove rail dust from compatible white paint when used correctly. Wash the vehicle first, apply the product according to its instructions, and rinse thoroughly without allowing it to dry. Additional treatment should be based on the condition of the paint.
Does ceramic coating prevent iron contamination?
No. Ceramic coatings can make a vehicle easier to clean, but they do not prevent all iron particles from settling or bonding to the surface. Coated vehicles may still need periodic decontamination using products explicitly approved for the coating.
Should I polish my car after iron removal?
Not always. If the paint is clean, smooth, and free of visible defects, polishing may not be necessary. Consider polishing when appropriate correction is needed to address remaining surface imperfections, and follow the preparation instructions for any protection you plan to apply afterward.
Conclusion
Learning how to remove iron from car paint helps you maintain a cleaner, smoother finish and prepare your vehicle for effective paint protection. The key is to wash the vehicle first, apply a compatible iron fallout remover according to its instructions, and rinse away the dissolved contamination before the product dries.
A clay bar treatment can provide additional cleaning when other bonded contaminants remain, but it should not be considered mandatory after every chemical treatment. Inspect the surface, choose the appropriate method, and avoid aggressive rubbing that could introduce scratches or marring.
With proper maintenance and timely decontamination, you can manage iron contamination more effectively and keep your vehicle’s exterior looking its best.