Rock chips should be fixed as soon as possible by cleaning the damaged area thoroughly, addressing any surface rust if bare metal is already exposed, applying primer if needed, filling the chip with matched touch-up paint in thin layers, and sealing it with clear coat once the paint has fully dried.
Acting quickly matters because once a rock chip breaks through the clear coat and exposes bare metal underneath, moisture can begin causing rust, and once rust starts, it can spread under the surrounding paint and compromise the panel if left unaddressed.
The good news is that catching a rock chip early makes this a genuinely manageable DIY repair that doesn’t require bodywork experience or expensive tools. In this guide, you’ll learn exactly why rock chips lead to rust, what you need to repair them, how to fix rock chips before they rust, and when professional bodywork is a better option.
Why Do Rock Chips Lead to Rust So Quickly?
A rock chip that only damages the clear coat isn’t an immediate rust risk, but once the impact is hard enough to break through both the clear coat and the base color coat down to bare metal, that exposed metal has no protective barrier left against moisture. Rust, or oxidation, can begin forming on exposed metal relatively quickly under humid or wet conditions, which is why fresh chips should be addressed rather than left exposed.
Rust can also spread outward underneath the surrounding paint, working its way beneath the clear coat and base coat even in areas that look untouched from the surface. This is why a small, seemingly insignificant chip can eventually lead to a much larger area of bubbling or flaking paint if it’s left unaddressed for months or years.
What You’ll Need to Fix a Rock Chip
A proper rock chip repair requires a wax-free degreaser or rubbing alcohol for cleaning, touch-up paint matched specifically to your vehicle’s paint code, a fine detail brush or toothpick for precise application, and clear coat to seal the repair once the paint has dried.
If any surface rust is already present, you’ll also need a rust converter product and possibly a self-etching primer to properly treat the exposed metal before painting over it.
Finding your correct touch-up paint color is one of the most important steps in this process. You can typically find the correct color by checking your vehicle’s paint code sticker, which is often located in the door jamb or under the hood, or by contacting your dealership or a reputable automotive paint supplier.
Step-by-Step: How to Fix Rock Chips Before They Rust
The repair process is straightforward when the chip is small and the surrounding paint is still in good condition. Start by cleaning the damaged area, then treat any surface rust and prime exposed metal before applying matched touch-up paint. Finish with clear coat, and only wet-sand and polish the repair if the finished surface needs to be leveled or blended.
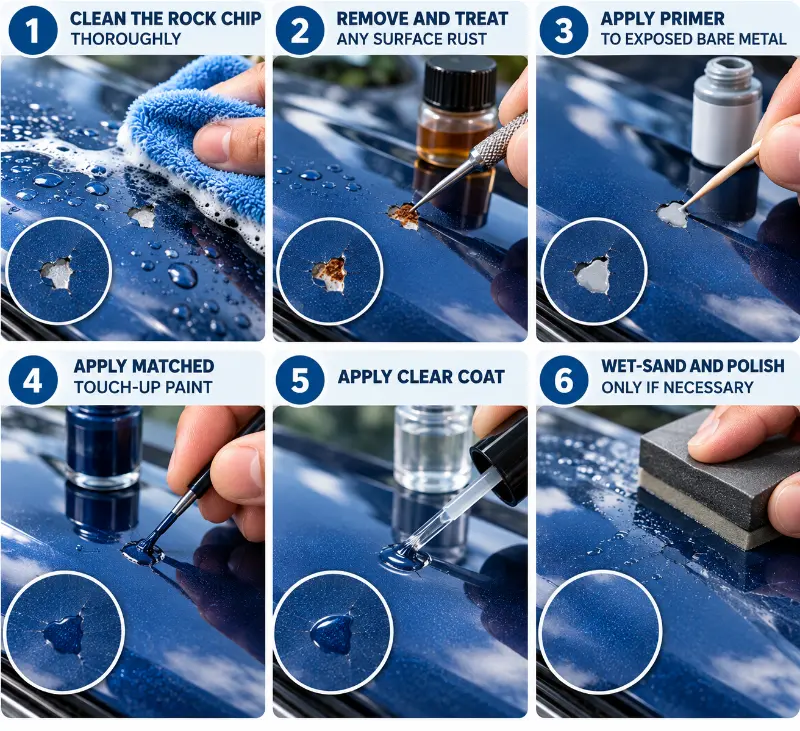
1. Clean the Rock Chip Thoroughly
Start by thoroughly cleaning the chipped area with soap and water. Once the area is clean and dry, wipe it down with rubbing alcohol or a wax-free degreaser to remove any remaining grease, wax, or road film that could interfere with the repair bonding properly.
Make sure the surrounding paint is completely clean before moving to the next step.
2. Remove and Treat Any Surface Rust
If any surface rust is visible inside the chip, gently remove loose corrosion using an appropriate fine abrasive tool.
Once the loose rust has been removed, apply a rust converter if the product is suitable for the affected surface and follow its instructions carefully. Allow the treated area to dry completely before continuing.
Do not simply paint over active rust. Doing so can trap corrosion underneath the new paint and allow the problem to continue.
3. Apply Primer to Exposed Bare Metal
If bare metal is exposed, apply a small amount of appropriate primer directly into the chip.
A self-etching primer may be suitable for certain bare-metal applications, but always follow the specific product instructions and confirm that the primer is compatible with the surface and touch-up paint you are using.
Use a toothpick or fine applicator to keep the primer inside the chip rather than spreading it unnecessarily over the surrounding factory paint.
Allow the primer to dry completely before applying touch-up paint.
4. Apply Matched Touch-Up Paint
Apply your matched touch-up paint in thin layers using a toothpick, fine detail brush, or the applicator supplied with the paint.
Dab the paint precisely into the chip instead of spreading a thick layer across the surrounding surface.
For deeper chips, several thin applications are generally easier to control than one thick application. Allow each layer to dry according to the paint manufacturer’s instructions before applying another.
The goal is to gradually fill the damaged area while keeping the repair as close as possible to the surrounding factory paint.
5. Apply Clear Coat
Once the final paint layer has dried according to the manufacturer’s instructions, apply the appropriate clear coat over the repaired area.
Use thin coats rather than trying to build the entire repair with one heavy application.
Allow the clear coat to cure according to its instructions. Do not rush into wet sanding or polishing simply because the surface feels dry. Some products require substantially more curing time before additional finishing work is appropriate.
6. Wet-Sand and Polish Only If Necessary
Once the repair has fully cured, assess whether additional finishing is actually needed.
If the touch-up repair stands slightly proud of the surrounding surface, very careful wet sanding with an appropriate fine abrasive followed by polishing may help level and blend the repair.
This step requires more care than simply applying touch-up paint. Avoid aggressive sanding because it is possible to damage the surrounding factory clear coat.
How Can You Prevent Future Rock Chips?
While rock chips can’t be entirely avoided on a daily-driven vehicle, applying paint protection film to particularly vulnerable areas such as the front bumper, hood, and side mirrors can reduce the impact damage those areas receive from road debris.
Maintaining a safe following distance behind other vehicles, especially on highways and gravel roads, can also reduce your exposure to kicked-up rocks and debris.
A quality wax, sealant, or ceramic coating won’t prevent a rock chip from happening because these products do not provide the same physical impact protection as paint protection film. They can, however, provide a protective layer over the surrounding paint and make routine maintenance easier.
When Does a Rock Chip Need Professional Bodywork?
A rock chip needs professional bodywork rather than a DIY touch-up when the damage extends beyond a small, isolated spot, such as a chip that’s part of a larger area of cracked or peeling paint, or when rust has already spread noticeably beneath the surrounding clear coat before you caught it.
Deep chips that have exposed a significant area of bare metal, or damage located on a curved or complex body line where blending touch-up paint seamlessly is genuinely difficult, are also better candidates for a professional repair than a home fix.
If you’re uncertain whether a specific chip is a good DIY candidate, examine it closely under bright light and determine whether the damage is limited to a small point or has spread across a wider area. When in doubt, getting a quick opinion from a body shop before attempting a repair yourself can help prevent a repair that doesn’t hold up well over time.
Frequently Asked Questions About Rock Chip Repair
How Quickly Does Rust Start After a Rock Chip Exposes Bare Metal?
Rust can begin forming on exposed bare metal relatively quickly under humid or wet conditions, which is why addressing a fresh rock chip promptly is better than leaving exposed metal unprotected for weeks or months.
Can a Rock Chip Be Repaired Without Matching the Exact Paint Color?
Using an exact color match is important for a repair that blends well with the surrounding factory paint. Even a slightly different color can be noticeable, especially in direct sunlight.
Take the time to find your vehicle’s specific paint code instead of guessing based only on the vehicle’s color name.
Is Professional Repair Necessary for Rock Chips?
No. Small to medium rock chips can often be repaired at home with the right touch-up paint, primer when needed, and clear coat.
DIY repair is most appropriate when the damage is small and localized and has not developed into significant rust or widespread paint failure.
What Should You Do If a Rock Chip Has Already Started Rusting?
If rust has already started, remove loose corrosion and use an appropriate rust converter if the product is suitable for the affected surface. Follow the product’s instructions before applying primer and paint.
Do not simply paint directly over active rust because the corrosion can continue underneath the new paint.
How Often Should You Inspect Your Vehicle for New Rock Chips?
Checking your vehicle every few weeks, particularly after highway driving or trips on gravel roads, can help you catch fresh damage while it is still limited to a small area.
Pay particular attention to the front bumper, hood, leading edges of the roof, side mirrors, and other forward-facing painted surfaces.
Final Thoughts
Fixing a rock chip before it develops into rust is much easier than repairing widespread corrosion and damaged paint later. The basic process is straightforward: clean the area, treat any existing surface rust, prime exposed metal when appropriate, apply matched touch-up paint in thin layers, and protect the repair with clear coat.
The most important part is catching the damage early. A small chip with clean edges is much easier to repair than one that has been exposed to moisture and developed corrosion underneath the surrounding paint.
After repairing the chip, continue checking your vehicle regularly for new damage so fresh chips can be addressed before they develop into larger paint or rust problems.