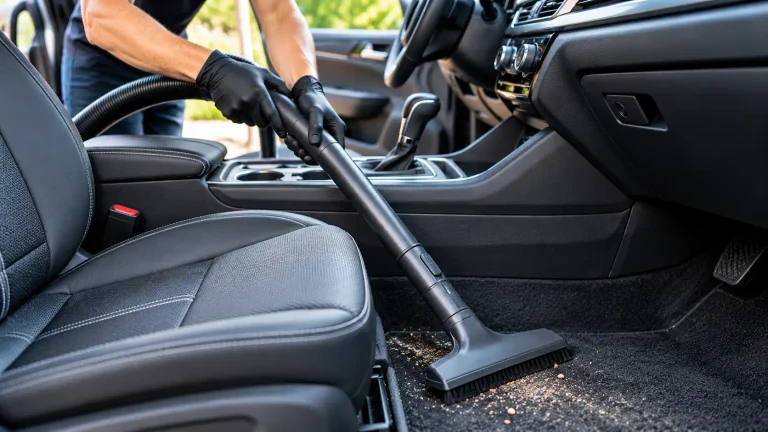
A neat car interior starts with a simple order: clear out loose items, remove the floor mats, and vacuum from the upper surfaces down to the carpet. Use a brush attachment for delicate areas, a crevice tool for narrow gaps, and a wider nozzle for seats and floors.
The technique matters more than owning an expensive vacuum. Slow, overlapping passes lift more debris than a quick sweep, while moving the seats gives you access to dirt that would otherwise stay hidden. Here is how to clean the whole cabin without scattering dirt onto areas you have already finished.
What You Need to Vacuum a Car
Gather these supplies before you start:
- A vacuum with a hose or handheld body and a clean filter
- A crevice tool for seat gaps, rails, and console edges
- A soft brush attachment for vents and other delicate surfaces
- A wider upholstery or floor nozzle for seats and carpet
- A small detailing brush or soft paintbrush for loosening dust
- A trash bag and a container for loose belongings
- An optional pet-hair brush appropriate for your upholstery
A household vacuum with a hose can work well if it reaches the car. A cordless handheld vacuum is convenient, though its bin and battery may need attention during a thorough cleaning. A wet/dry vacuum can handle bigger messes, but use it for liquids only if the manufacturer permits wet pickup and you have set it up as instructed.
Prepare the Car and Vacuum
Park somewhere with enough room to open the doors. Set the parking brake and turn off the vehicle. If you use a corded vacuum, keep its cord away from traffic, water, and closing doors. Use any extension cord according to the vacuum and cord manufacturers’ instructions.
Empty the vacuum bin and check the filter before starting. A full bin, clogged filter, or blocked hose can reduce airflow and make the job take longer. Follow the manufacturer’s instructions for cleaning or replacing the filter.
Remove trash, bottles, coins, toys, and other loose objects. Check seat pockets, cup holders, and the spaces beside the seats. Pick up sharp objects by hand rather than sending them through the vacuum, and wear suitable gloves if you may encounter broken glass.
Finally, take out the floor mats. This exposes the carpet beneath them and gives you room to clean the mats separately.
Vacuum From Top to Bottom
Work from higher surfaces toward the floor so loosened dust falls onto areas you have not yet cleaned. Within each area, move from cleaner surfaces toward dirtier ones. This order also helps keep a sandy floor nozzle away from sensitive trim.
1. Dust the Dashboard, Vents, and Console
Fit the soft brush attachment and lightly vacuum accessible dashboard surfaces, air vents, and console seams. Use a small detailing brush to loosen dust from tight edges, then hold the vacuum nearby to catch it.
Avoid pressing hard on screens, glossy trim, switches, or delicate vent vanes. Check the vehicle owner’s manual before cleaning displays or other sensitive materials. If the brush attachment is gritty or damaged, clean or replace it before using it on interior trim.
Open cup holders and small storage compartments if practical, remove loose contents, and vacuum inside. A crevice tool can reach the bottom, but use it gently around plastic edges.
2. Clean the Seats and Seat Gaps
Start with the seatbacks and cushions, using the upholstery nozzle. Make slow, overlapping passes rather than scrubbing aggressively. Pay attention to stitching, folds, and the junction between the cushion and seatback, where crumbs collect.
Use the crevice tool along the edges and between the seats and center console. Do not force the nozzle into a tight gap or pull at upholstery seams. On leather or other easily marked surfaces, use a clean, soft attachment and light pressure.
Move each front seat forward to reach behind and underneath it, then move it back to access the front. Keep fingers, loose objects, and vacuum attachments clear of seat tracks while adjusting the seat. Once the seat has stopped moving, vacuum the exposed carpet and reachable areas around the rails.
Avoid tugging on wiring or connectors under the seats. If the nozzle cannot reach a spot without disturbing them, use a softer, narrower attachment or leave that area for a professional detailer.
3. Vacuum the Carpet and Footwells
Use the wider nozzle for open carpet and the crevice tool along the doorsills, console edges, and around seat mounts. Work in overlapping lines so you can see which areas are finished.
For stubborn grit, make a pass in one direction and then another across it. A soft carpet brush can help loosen embedded material before you vacuum again. Test the brush in an inconspicuous area first, especially on delicate or worn carpeting.
Pay particular attention to the driver’s footwell, where grit can collect around the pedals and mat attachment points. Do not force tools behind pedals or interfere with their movement. Finish by checking the rear footwells and the narrow edges beneath the front seats.
4. Clean the Trunk or Cargo Area
Remove loose cargo and lift out a removable cargo mat or liner if fitted. Vacuum the floor, side edges, and seams with the appropriate attachments. If you lift a cargo-floor panel to reach a storage compartment, return it securely to its normal position afterward.
Keep wet or heavily soiled items separate from the clean interior until they have been dealt with. A standard dry vacuum is not a substitute for cleaning up a liquid spill.
Clean the Floor Mats Separately
With the mats out of the car, shake off loose dirt in a suitable outdoor area. Vacuum carpeted mats on both sides, concentrating on the side that faces up. A brush can loosen grit caught in the fibers before a second vacuum pass.
For rubber or all-weather mats, vacuum loose debris or shake it away. If the mat manufacturer permits washing, clean them according to its directions and let them dry completely before reinstalling them. Moisture trapped beneath a mat can leave the carpet damp.
Return each mat to its correct position and secure it using the vehicle’s retention system where provided. Do not stack mats or place one where it can interfere with the pedals. After reinstalling the driver’s mat, check that it is secure and that the pedals can move freely.
How to Remove Pet Hair and Stubborn Debris
Vacuum loose hair first. For hair caught in fabric, use a pet-hair tool or a suitable rubber brush to gather it into small piles, then vacuum those piles. Work gently and test the tool on a hidden area to check that it does not pull or damage the upholstery.
For sand and dry grit, loosen the carpet fibers with a soft brush and vacuum slowly. A crevice tool helps collect material along seams, but a wider nozzle is usually easier for the middle of a floor mat or seat.
If a stain remains after loose debris is gone, treat it separately with a cleaner suitable for the material and follow both the cleaner’s directions and the vehicle manufacturer’s guidance. Vacuuming alone will not reliably remove a set-in stain.
What to Do With Wet or Hazardous Messes
Do not use a dry-only vacuum to pick up water or other liquids. A wet/dry vacuum must be configured for wet pickup according to its instructions; the required setup can differ by model.
For a small spill, address it promptly using a method appropriate for the liquid and upholstery. Blotting with clean towels can help remove excess moisture, but avoid soaking the padding. Allow the area to dry fully before covering it with a mat or cargo liner.
A large spill, persistent dampness, suspected mold, bodily fluids, or another hazardous material may require professional cleaning. If you find mold, address the moisture source as well as the contamination.
Common Vacuuming Mistakes to Avoid
- Starting with the floor: Dust knocked off the dashboard or seats can land on freshly cleaned carpet.
- Leaving mats in place: Dirt remains trapped underneath and around their edges.
- Rushing each pass: Slow, overlapping movements give the nozzle more opportunity to collect debris.
- Using a dirty attachment on delicate trim: Grit on a nozzle can mark sensitive surfaces.
- Forcing a crevice tool into gaps: Hard edges can snag upholstery or disturb components beneath a seat.
- Ignoring the vacuum filter: Reduced airflow can make a capable vacuum feel ineffective.
- Reinstalling damp mats: Trapped moisture can keep the underlying carpet wet.
How to Keep the Car Neat After Vacuuming
Keep a small bag or container in the car for trash, and remove it regularly. Empty cup holders and door pockets before crumbs and wrappers accumulate. Shake out removable mats between full cleaning sessions, then spot-vacuum the driver’s footwell and other high-use areas as needed.
If you carry pets, children, tools, or outdoor gear, a removable seat cover or cargo liner may make routine cleanup easier. Choose one that fits properly and does not obstruct safety equipment or vehicle controls. You do not need to buy a full set of detailing tools if your existing vacuum and a suitable crevice attachment already reach the areas you use.
Finish With a Quick Cabin Check
Walk around the car before putting everything away. Check seat gaps, footwell edges, cup holders, and the cargo area for missed debris. Return the seats to comfortable positions, reinstall and secure the dry mats, and put back only the belongings you need.
A careful top-to-bottom routine makes the next cleaning easier: loose dirt is removed before it becomes embedded, and the cabin stays orderly without requiring a lengthy detail every time.