Exterior car detailing is the process of deep cleaning, restoring, and protecting the outside surfaces of a vehicle.
Exterior surfaces face constant exposure to UV rays, road salt, brake dust, industrial fallout, bird droppings, tree sap, and airborne contaminants. These elements gradually reduce paint gloss, weaken clear coat protection, and make the surface rough over time.
Automotive paint protection is becoming more important as modern clear coats are thinner and more sensitive than older finishes. Regular detailing helps remove bonded contaminants, reduce oxidation risk, improve shine, and add protective layers such as wax, sealant, or ceramic coating.
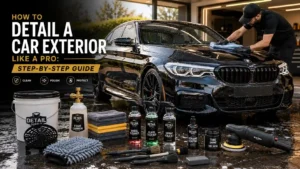
This guide explains what exterior car detailing is, how it differs from washing, which tools are needed, the step-by-step detailing process, common mistakes, detailing frequency, and pro tips for a showroom finish.
Step-by-Step Exterior Car Detailing Process
Exterior detailing follows a structured order. Each step prepares the surface for the next stage and reduces the risk of scratches, swirl marks, and contamination.
Steps Overview
- Pre-rinse the car
- Clean wheels and tires first
- Apply snow foam or pre-wash
- Hand wash using the two-bucket method
- Rinse and dry the car properly
- Remove contaminants with clay bar treatment
- Polish the paint for shine
- Apply wax, sealant, or ceramic coating
- Clean exterior glass and mirrors
- Dress tires and trim
Step 1: Pre-Rinse the Car
Start by rinsing the full exterior with clean water. This removes loose dust, sand, mud, and surface debris before contact washing.
Pre-rinsing reduces friction and lowers the chance of dragging dirt across the paint with a wash mitt.
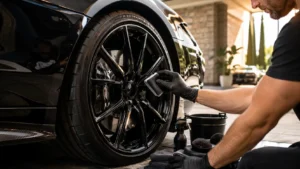
Step 2: Clean Wheels and Tires First
Clean the wheels and tires before washing the paint. Wheels collect brake dust, road grime, grease, and mud, so they need stronger cleaning than painted panels.
Use a dedicated wheel cleaner, tire cleaner, and wheel brush. Clean one wheel at a time and rinse thoroughly before the cleaner dries.
Step 3: Apply Snow Foam or Pre-Wash
Snow foam or pre-wash helps loosen dirt before hand washing. This step reduces direct contact with the paint and improves washing safety.
Apply the product evenly across the vehicle and allow it to dwell according to the instructions. Do not let it dry on the surface.
Step 4: Hand Wash Using the Two-Bucket Method
Use one bucket for clean shampoo water and another bucket for rinsing the dirty wash mitt. This method helps prevent dirt from being reapplied to the paint.
Wash the car from top to bottom. Start with the roof, windows, hood, and upper panels, then move to lower doors, bumpers, and side skirts.
Step 5: Rinse and Dry the Car Properly
Rinse the car thoroughly after washing. Make sure no soap remains on the paint, glass, wheels, or trim.
Dry the vehicle with a clean microfiber drying towel. Avoid air drying because minerals in water can leave spots on paint and glass.
Step 6: Remove Contaminants with Clay Bar Treatment
A clay bar removes bonded contaminants that normal washing cannot remove. These may include industrial fallout, tar residue, brake dust particles, and rough surface buildup.
Use clay lubricant and glide the clay gently over the paint. Do not press hard. After claying, the surface should feel smoother and ready for polishing or protection.
Step 7: Polish the Paint for Shine
Polishing removes or reduces light swirl marks, oxidation, haze, and minor scratches. It improves paint clarity and restores gloss.
Use polish only when needed. Frequent or aggressive polishing can reduce clear coat thickness over time.
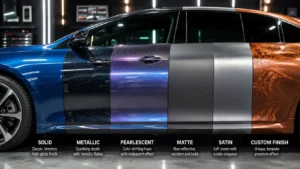
Step 8: Apply Wax, Sealant, or Ceramic Coating
Apply paint protection after washing, drying, and polishing. Wax, sealant, and ceramic coating each create a protective layer on the paint.
Wax gives a warm gloss and is easy to apply. Sealants last longer than wax. Ceramic coatings offer stronger durability but require better surface preparation and careful application.
Step 9: Clean Exterior Glass and Mirrors
Clean the windshield, side windows, rear glass, and mirrors with an automotive glass cleaner. Use a dedicated glass towel to avoid streaks.
Clean glass improves visibility and gives the exterior a sharper finished appearance.
Step 10: Dress Tires and Trim
Apply tire dressing to clean, dry tires for a dark and finished look. Use trim dressing or protectant on faded plastic and rubber trim when needed.
Avoid applying too much product. Excess dressing can sling onto paint while driving and attract dust.
Benefits of Proper Exterior Detailing
Proper exterior detailing helps preserve both the appearance and condition of a vehicle’s paintwork. It removes harmful contaminants and adds protective layers that reduce exposure to environmental damage.
Paint Protection
Vehicles are exposed to pollutants, road grime, bird droppings, tree sap, and UV rays every day. These contaminants can stain or weaken the clear coat when left untreated.
Exterior detailing removes these materials and applies wax, sealant, or ceramic coating to create a protective barrier on the paint surface.
Improved Gloss and Appearance
Polishing, waxing, and surface preparation improve paint clarity, depth, and smoothness. A detailed exterior looks cleaner and more refined than a vehicle that only receives basic washing.
Detailing also helps reduce dullness, light oxidation, and minor swirl marks, giving the car a more polished finish.
Reduced Oxidation and Fading
Continuous UV exposure can break down paint surfaces over time. This may lead to fading, dullness, and oxidation.
Protective products such as waxes, sealants, and ceramic coatings help reduce direct exposure to UV rays and environmental contaminants.
Better Long-Term Value
A well-maintained exterior signals proper vehicle care. Clean paint, clear glass, protected trim, and well-kept wheels can support better resale appeal over time.
Consistent detailing helps prevent damage that may require costly paint correction or restoration later.
Essential Tools and Products for Exterior Detailing
Exterior detailing requires purpose-built tools and products that clean, correct, and protect without damaging the vehicle’s surface. The right detailing kit reduces friction, prevents scratches, and improves the final finish.
Basic Car Detailing Kit Checklist
A standard exterior detailing kit should include the following items:
- pH-balanced car shampoo
- Microfiber wash mitt
- Microfiber drying towels
- Wheel cleaner
- Tire cleaner
- Dedicated wheel and tire brushes
- Clay bar or clay mitt
- Polish or compound
- Wax, sealant, or ceramic coating
- Exterior glass cleaner
- Tire dressing
- Trim restorer or protectant
Choosing the Right Car Shampoo and Cleaners
Car shampoo plays an important role in paint safety. A pH-balanced formula cleans dirt and grime without stripping wax, sealant, or coating.
Avoid dish soap and harsh household detergents. These products can remove protective layers, dry out rubber trim, and reduce paint protection over time.
Microfiber Towels, Brushes, and Equipment
Microfiber towels are safer for paint because they are soft, absorbent, and effective at trapping dirt particles. They help reduce the risk of scratches during washing, drying, and wiping.
Use separate towels for paint, wheels, glass, and trim. Never use the same towel on dirty wheels and painted panels.
Detailing brushes are useful for wheels, badges, grills, trim edges, and tight areas where regular towels cannot reach.
3 Common Exterior Detailing Mistakes to Avoid
Exterior detailing mistakes can damage paint, reduce gloss, and shorten the life of protective products. Proper technique helps prevent avoidable defects.
1. Washing Under Direct Sunlight
Direct sunlight causes water, shampoo, and cleaners to dry too quickly on the surface. This can leave water spots, streaks, and residue marks.
Detail the car in shade or during cooler parts of the day for better control.
2. Using Dirty Towels or Sponges
Dirty towels, rough sponges, and contaminated wash mitts can drag particles across the paint. This creates scratches and swirl marks.
Use clean microfiber towels and wash mitts. Store them properly and replace worn tools when they become rough or damaged.
3. Skipping Protection Steps
Unprotected paint is more exposed to UV rays, moisture, pollutants, and road grime. Wax, sealant, or ceramic coating creates a barrier that helps preserve the finish.
Skipping protection reduces the long-term value of the detailing process.
Pro Tips to Get a Showroom Finish
A showroom-level finish depends on proper sequence, clean tools, and careful product application. Small technique improvements can make a visible difference.
Work from Top to Bottom
Always clean from the upper sections down to the lower sections. Dirt naturally moves downward with water, so this method prevents recontamination of cleaned panels.
Use High-Quality Products
Quality detailing products clean more safely and provide better protection. Choose paint-safe shampoo, soft microfiber towels, proper wheel cleaners, and reliable protection products.
Cheap or harsh products can leave residue, strip protection, or damage sensitive surfaces.
Maintain a Regular Detailing Schedule
Regular maintenance prevents heavy contamination from building up. Frequent washing and periodic detailing reduce the need for aggressive correction later.
A consistent routine keeps paint smoother, glossier, and easier to clean.
How Often Should You Detail Your Car Exterior?
Exterior detailing frequency depends on driving habits, weather, storage conditions, and environmental exposure. Cars parked outdoors, driven daily, or exposed to salt, mud, rain, and sun need more frequent care.
| Aspect | Weekly Washing | Monthly or Periodic Detailing |
| Benefit | Prevents dirt buildup | Maintains paint condition and protection |
| Best For | Regular upkeep | Long-term finish quality |
| Cleaning Level | Basic exterior cleaning | Thorough cleaning and decontamination |
| Frequency | Every 1 to 2 weeks | Every 1 to 3 months |
| Protection | Minimal or none | Adds wax, sealant, or coating |
| Purpose | Removes surface dirt, dust, and pollutants | Deep cleaning and surface protection |
| Time Required | 15 to 30 minutes | Several hours |
Seasonal Exterior Detailing Tips
Different seasons create different detailing needs. Adjusting your routine helps protect the vehicle throughout the year.
Winter Detailing
Winter exposes vehicles to road salt, moisture, and grime. These materials can increase the risk of corrosion, especially around lower panels, wheels, and the undercarriage.
Wash more frequently during winter and apply protection before the season begins.
Summer Detailing
Summer heat and UV exposure can fade paint, dry out trim, and increase oxidation risk. Use wax, sealant, or ceramic protection to reduce direct exposure.
Detail the car in shade and avoid applying products on hot panels.
Rainy Season Detailing
Rain, mud, and road film can leave stains and buildup on paint, glass, and wheels. Regular washing and glass cleaning help maintain visibility and surface protection.
A water-repellent coating on glass can also improve wet-weather driving visibility.
Conclusion
Exterior car detailing is a structured process that combines cleaning, decontamination, correction, and protection. Each step helps preserve paint quality, improve gloss, and reduce long-term surface damage.
A proper detailing routine removes harmful contaminants before they bond deeply into the paint. It also adds protective layers that help defend the surface against UV rays, moisture, road grime, and pollutants.
Consistent exterior detailing keeps a vehicle cleaner, smoother, and better protected. When done correctly, it improves appearance, supports paint durability, and helps maintain vehicle value over time.
Frequently Asked Questions
How long does exterior car detailing take?
Exterior car detailing usually takes 2 to 5 hours, depending on vehicle size, paint condition, and service level. A basic wash and wax takes less time, while polishing, clay bar treatment, and ceramic coating take longer.
Can I detail my car at home like a professional?
Yes, you can detail your car at home with the right tools, products, and process. Proper washing, drying, decontamination, polishing, and protection techniques matter more than using expensive equipment alone.
What is the best product for car exterior protection?
The best exterior protection product depends on durability needs. Wax is easy to apply and gives strong gloss. Sealant lasts longer than wax. Ceramic coating offers stronger durability and better resistance against water, dirt, and contaminants.
Is waxing better than ceramic coating?
Wax is easier to apply and gives a glossy finish, but ceramic coating lasts longer and provides stronger protection. Wax usually lasts weeks to months, while ceramic coating can last years with proper maintenance.
Do I need to polish every time I detail my car?
No, polishing is not needed every time you detail your car. Polish only when the paint has swirl marks, oxidation, haze, or light scratches. Frequent polishing can gradually reduce clear coat thickness.