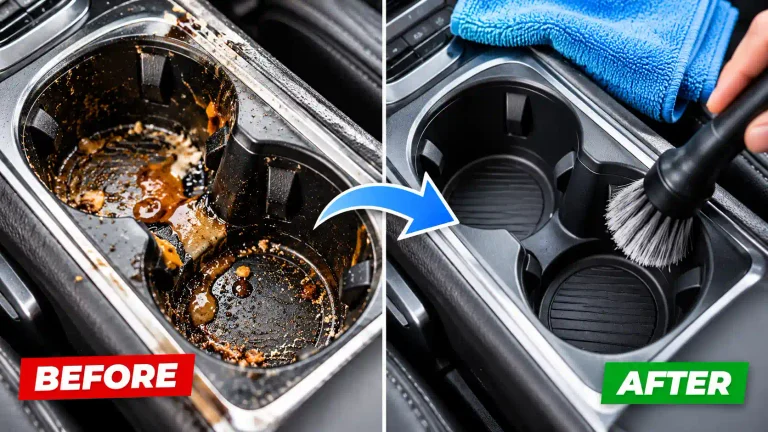
Car cup holders collect more dirt than most drivers realize. Coffee spills, sticky soda, crumbs, dust, and oily residue can build up inside the cup holder and around its edges. Over time, this grime can cause unpleasant odors, leave sticky surfaces, and make your car’s interior look poorly maintained.
The good news is that you do not need expensive equipment or professional detailing services to clean most car cup holders effectively. With a few basic supplies, the right cleaning techniques, and a little patience, you can remove stubborn residue and restore a clean appearance without damaging the surrounding trim.
This guide explains how to clean car cup holders step by step, including how to remove sticky drink residue, reach narrow corners, clean removable inserts, and prevent future buildup. You will also learn which products to avoid and how to handle cup holders with electronic controls or sensitive interior finishes.
Why Cleaning Car Cup Holders Matters
Cup holders are designed to keep drinks secure while you drive, but their recessed shape makes them easy places for dirt and liquid to accumulate.
Unlike flat dashboard surfaces, cup holders often have deep corners, textured bottoms, rubber inserts, and narrow edges that trap contamination. Spilled drinks can dry into sticky deposits, while crumbs and dust collect underneath removable liners.
Regular cleaning helps you:
- Remove sticky beverage residue before it hardens.
- Prevent food particles and spills from contributing to unpleasant odors.
- Maintain the appearance of your vehicle’s center console.
- Reduce the buildup of dirt around rubber inserts and textured surfaces.
- Identify liquid spills before they reach nearby switches or electronic components.
Cup holders should be cleaned as part of routine interior maintenance, especially if you regularly drink coffee, soft drinks, or other beverages in your vehicle.
Supplies You Need to Clean Car Cup Holders
Before you begin, gather the right tools. You can clean most cup holders with ordinary automotive detailing supplies and a small amount of suitable cleaning solution.
| Cleaning supply | What it does |
|---|---|
| Microfiber towels | Wipe surfaces and remove loosened dirt |
| Soft detailing brush | Lifts dust and debris from corners |
| Small vacuum with a brush attachment | Removes loose crumbs and particles |
| Cotton swabs | Reach narrow seams and edges |
| Detailing swabs or a soft detailing brush | Clean recessed areas and textured surfaces |
| Automotive interior cleaner | Removes everyday grime and suitable sticky residue |
| Mild soap and water | Cleans compatible removable inserts |
| Small container | Holds a small amount of cleaning solution |
| Plastic trim tool, if needed | Helps lift removable inserts without scratching them |
Choose a cleaner compatible with the specific material in your vehicle. Cup holders may be made from hard plastic, rubber, soft-touch coatings, leather-wrapped trim, or a combination of materials.
Always follow the vehicle manufacturer’s cleaning instructions and the cleaner’s label.
Avoid pouring cleaning solution directly into the cup holder. Nearby USB ports, switches, wiring, and other electronic components may be vulnerable to liquid intrusion.
Step 1: Empty the Cup Holders and Inspect the Area
Start by removing everything stored in the cup holders, including bottles, coins, wrappers, and removable drink inserts.
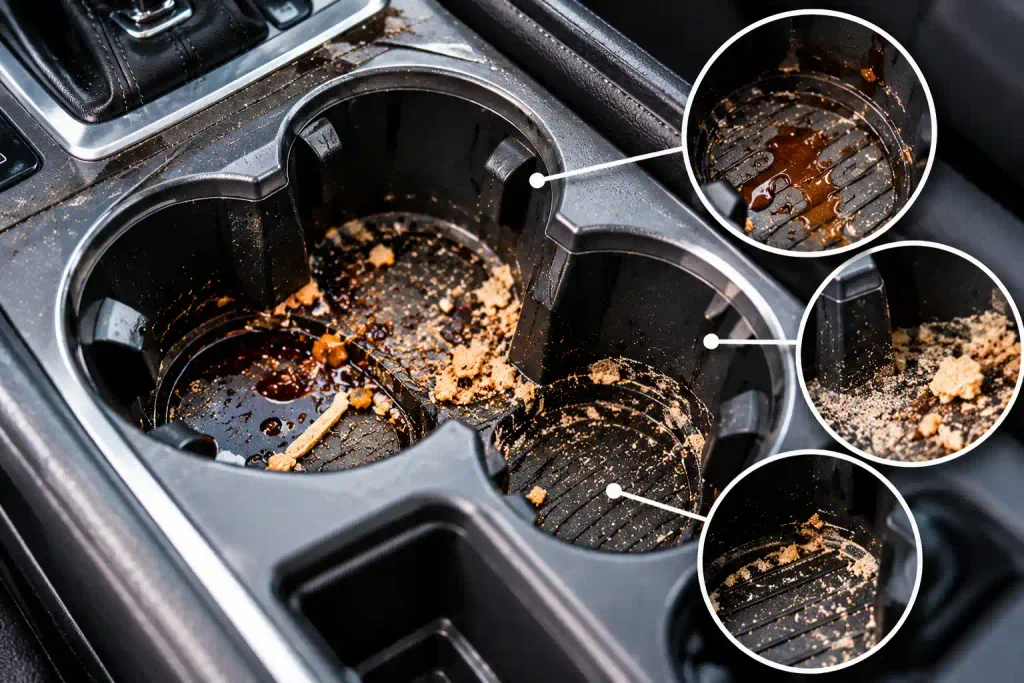
Inspect the bottom and sides of each cup holder to identify the type of dirt you need to remove.
Look for:
- Loose crumbs and dust.
- Dried coffee or tea.
- Sticky soda or juice residue.
- Greasy fingerprints.
- White mineral deposits from dried water.
- Mold-like growth or persistent odors.
- Dirt trapped beneath rubber inserts.
This inspection helps you choose the right cleaning method without using more moisture or stronger chemicals than necessary.
If the cup holder is located beside electronic buttons, a gear selector, or a charging port, take extra care to keep liquids away from those components.
Turn off the vehicle before cleaning. If you need to access an area around powered accessories, follow the vehicle manufacturer’s instructions.
Step 2: Remove Loose Crumbs and Dust
Always remove loose debris before applying cleaner. Otherwise, crumbs may become wet and form a muddy residue that is harder to remove.
Use a small vacuum with a soft brush attachment. Move it around the bottom, walls, and corners of the cup holder without pressing the nozzle aggressively against the plastic.
For narrow recesses, use a soft detailing brush to loosen particles while vacuuming.
If a vacuum is unavailable, gently lift the debris with a dry microfiber towel or a clean, soft brush.
Avoid blowing dust deeper into the console with compressed air. This can move debris into seams or sensitive areas that are difficult to access.
Once the loose dirt is removed, inspect the cup holder again. You should now be able to see the sticky or dried-on residue that requires further treatment.
Step 3: Remove Removable Cup Holder Inserts
Many vehicles have removable rubber liners or plastic inserts that make cleaning easier. However, not every cup holder is designed to come apart.
Check the owner’s manual or inspect the insert carefully to determine whether it can be removed.
If the insert lifts out easily, remove it gently. Do not force it with a screwdriver or another hard object, as this may scratch the trim or break a retaining clip.
Place the insert on a suitable cleaning surface.
For compatible rubber or hard-plastic inserts:
- Remove loose debris with a soft brush.
- Clean the insert with a small amount of mild soap and water or a compatible interior cleaner.
- Use a soft brush to remove residue from grooves and textured sections.
- Rinse only if the material and product instructions allow it.
- Wipe away remaining moisture and allow the insert to dry completely.
Do not reinstall a wet insert. Trapped moisture can contribute to odors and allow dirt to stick more easily.
If the insert has a special coating, decorative finish, or integrated electronic feature, follow the manufacturer’s care instructions instead of using a general cleaning method.
Step 4: Apply a Suitable Interior Cleaner
For everyday grime and light sticky residue, an automotive interior cleaner compatible with the cup holder’s material is usually a good starting point.
Read the product label before use. Some cleaners are intended for hard plastic, while others are formulated for fabric, leather, or specific interior finishes.
Instead of spraying the cup holder heavily, apply a small amount of cleaner to a microfiber towel or detailing swab when the product instructions permit this method.
The towel should be lightly damp rather than dripping wet.
Wipe the bottom and sides of the cup holder using controlled movements. Work from the cleaner areas toward the dirtier sections to avoid spreading grime unnecessarily.
For textured surfaces, use a soft detailing brush to loosen residue gently.
Never flood the cup holder with cleaner or allow liquid to pool at the bottom. If you accidentally apply too much, absorb it immediately with a dry microfiber towel.
Step 5: Remove Sticky Soda and Juice Residue
Sticky drinks are among the most common causes of dirty cup holders. Soda, juice, sweetened coffee, and energy drinks can leave a sugary film when they dry.
This residue may feel tacky even after loose dirt has been removed.
Follow these steps to clean it safely.
A. Soften the residue
If the material is compatible with water, lightly dampen a microfiber towel with warm water. Press it against the sticky area briefly to help loosen the deposit.
Do not pour warm water directly into the cup holder.
B. Wipe the affected surface
Gently wipe the softened residue with the towel. Use a clean section of microfiber as the dirt transfers onto the fabric.
For dried deposits in corners, use a soft detailing brush or a cotton swab.
C. Use an appropriate cleaner if needed
If water alone does not remove the sticky film, use an interior cleaner approved for the material. Follow the label and test the product on a hidden area first when practical.
D. Remove remaining residue
If the product instructions permit, wipe the area with a separate cloth lightly dampened with clean water.
E. Dry the cup holder
Finish with a dry microfiber towel. Check the bottom and edges to ensure no moisture remains trapped in seams.
If the residue remains after several gentle attempts, stop and reassess the material and cleaning product rather than scrubbing harder.
Step 6: Clean Dried Coffee and Tea Stains
Coffee and tea can leave brown marks, especially when spills are not cleaned immediately.
Begin by removing loose particles and wiping the area with a lightly damp microfiber towel.
If a stain remains, apply a compatible automotive interior cleaner according to the manufacturer’s instructions.
Use a soft brush to clean textured plastic, paying particular attention to the junction between the bottom and sidewalls.
Avoid abrasive pads, scouring powders, and stiff brushes. These may scratch the surface or damage a soft-touch coating.
Some stains may have penetrated porous materials or affected a finish. If the mark does not improve with gentle cleaning, professional interior detailing may be a better option than repeated scrubbing.
Step 7: Reach Narrow Corners and Recessed Areas
Cup holders often have tight corners that are difficult to clean with an ordinary microfiber towel.
A detailing swab, cotton swab, or soft detailing brush can help you reach these areas.
Use the following technique:
- Lightly dampen the cleaning tool with a suitable cleaner.
- Work around the bottom edge and corners.
- Follow the contours of the cup holder without forcing the tool into narrow gaps.
- Use a clean swab to lift loosened residue.
- Wipe the area with a dry microfiber towel.
Change the swab when it becomes dirty. Otherwise, you may transfer grime from one corner to another.
Do not push cotton swabs into electrical openings, seams around buttons, or gaps where fibers could become trapped.
If the cup holder has a moving mechanism, sliding cover, or spring-loaded component, avoid forcing it open. Follow the vehicle’s instructions for cleaning those parts.
Step 8: Clean Rubber Inserts and Textured Surfaces
Rubber inserts are useful because they help stabilize drinks, but their grooves can collect dirt and sticky residue.
If the insert is removable, clean it separately using a compatible method.
If it cannot be removed, use a soft brush and a lightly dampened microfiber towel to clean the exposed grooves.
Work gently to loosen residue without stretching the rubber or pulling at the insert’s edges.
Avoid applying silicone sprays, oily dressings, or greasy protectants inside cup holders. These products may leave a slippery surface that can affect the stability of cups and bottles.
If the rubber has become sticky, cracked, or deteriorated, the material itself may be breaking down. Cleaning may not restore its original condition, and replacement may be necessary.
Step 9: Clean the Surrounding Center Console
Dirt rarely stays confined to the cup holder itself. The surrounding console may collect drink rings, fingerprints, dust, and oily marks.
Once the cup holder is clean, inspect the surrounding surfaces.
Use a microfiber towel and a compatible interior cleaner to wipe the adjacent trim. Apply the product to the towel rather than spraying toward buttons, switches, charging ports, or seams.
Different materials require different cleaning methods. Leather, soft-touch plastic, glossy trim, and painted surfaces should not automatically be treated with the same product.
For piano-black or glossy trim, use a clean, soft microfiber towel and minimal pressure to reduce the risk of fine scratches.
Avoid allowing cleaner to accumulate around the gear selector or electronic controls.
Step 10: Remove Odors and Inspect for Hidden Spills
A cup holder that looks clean may still smell unpleasant if liquid has reached an inaccessible area beneath the insert or inside the console.
After cleaning, check for:
- Persistent sugary or sour odors.
- Sticky residue returning after the surface dries.
- Moisture around seams.
- Discoloration beneath removable liners.
- Signs of mold-like growth.
If an odor remains, avoid masking it with fragrance sprays. First determine whether old liquid residue or trapped moisture is responsible.
If the spill appears to have entered the console, reached electrical components, or caused recurring odor, consult a professional detailer or automotive technician.
Do not pour disinfectant, bleach, or deodorizing liquid into the cup holder to eliminate the smell.
Step 11: Dry the Cup Holders Completely
Drying is an essential part of the cleaning process.
Use a clean microfiber towel to absorb moisture from the bottom, sidewalls, corners, and surrounding trim.
If you removed an insert, make sure both the insert and the area beneath it are completely dry before reinstalling it.
Allow the cup holder to air-dry if needed. Do not use a heat gun or apply excessive heat to speed up the process.
Before returning drinks or accessories to the cup holder, confirm that no cleaner or moisture remains.
A fully dry surface is less likely to trap fresh debris in leftover cleaning solution.
How to Clean Different Types of Cup Holder Materials
The safest cleaning method depends on the material and finish.
| Material | Recommended approach | Avoid |
|---|---|---|
| Hard plastic | Compatible interior cleaner and microfiber towel | Abrasive pads and unapproved solvents |
| Rubber inserts | Gentle brushing and compatible mild cleaning solution | Oily dressings and aggressive scrubbing |
| Soft-touch trim | Manufacturer-approved cleaner and light wiping | Strong chemicals and excessive pressure |
| Glossy black trim | Clean microfiber and a suitable gentle cleaner | Rough towels and gritty particles |
| Leather-wrapped trim | Leather-safe cleaner if approved for the finish | Saturation and general-purpose harsh cleaners |
| Fabric-lined cup holders | Material-appropriate upholstery cleaner with minimal moisture | Flooding the fabric or vigorous rubbing |
If you are uncertain about a material, consult the owner’s manual or the vehicle manufacturer’s care recommendations before cleaning.
Common Cup Holder Cleaning Mistakes to Avoid
Even a simple cleaning job can damage the interior if the wrong tools or products are used.
Using too much liquid
Excess liquid can seep into the console, damage nearby electronics, or become trapped beneath an insert.
Use a lightly dampened cloth and absorb spills immediately.
Scrubbing with abrasive tools
Steel wool, scouring pads, and stiff brushes can scratch plastic and damage coatings.
Choose soft microfiber towels and compatible detailing brushes instead.
Using strong household chemicals
Bleach, concentrated degreasers, and unapproved solvents may discolor surfaces or damage their finish.
Use a cleaner designed for the specific interior material.
Spraying cleaner directly into the console
Overspray can reach switches, buttons, USB ports, and electrical connections.
Apply cleaner to a cloth when permitted by the product instructions.
Reinstalling a wet rubber insert
Moisture trapped beneath the insert can contribute to odor and make dirt stick to the surface.
Dry the insert and the cup holder completely before putting everything back together.
Ignoring a recurring sticky surface
If the cup holder becomes sticky again after cleaning, residue may remain beneath an insert, or the material itself may be deteriorating.
Inspect the area instead of repeatedly applying stronger chemicals.
How Often Should You Clean Your Car Cup Holders?
The ideal cleaning frequency depends on how often you use your vehicle and whether you regularly carry drinks or food.
A practical maintenance routine is:
- After a spill: Blot it as soon as possible, provided it is safe to do so.
- During weekly interior cleaning: Remove crumbs and wipe visible grime.
- During monthly detailing: Inspect the corners and clean removable inserts if needed.
- When odors appear: Look for hidden residue or moisture rather than covering the smell.
- After a major spill: Check whether liquid has entered the surrounding console.
You do not need to perform a deep clean every week. Frequent removal of loose debris and prompt treatment of spills can reduce the need for aggressive cleaning later.
Tips to Keep Car Cup Holders Clean Longer
Once your cup holders are spotless, a few habits can help maintain the result.
- Use secure cups and bottles with lids to reduce accidental spills.
- Avoid leaving open sugary drinks in the vehicle.
- Remove crumbs and wrappers before they accumulate.
- Wipe fresh spills promptly with a microfiber towel.
- Use removable liners only when they fit properly and are suitable for your vehicle.
- Clean rubber inserts periodically instead of waiting for sticky buildup.
- Avoid oily protectants inside cup holders.
- Check beneath removable inserts when an unexplained odor develops.
These simple habits make regular interior maintenance easier and help preserve the appearance of your center console.
Frequently Asked Questions
What is the best cleaner for car cup holders?
A mild automotive interior cleaner that is compatible with the cup holder’s material is a good starting point. For compatible removable rubber or plastic inserts, mild soap and water may also work. Always follow the product label and vehicle manufacturer’s care instructions.
How do you remove sticky soda from a car cup holder?
Start by gently softening the residue with a lightly dampened microfiber towel if the material tolerates water. Wipe the area, then use a compatible interior cleaner if necessary. Remove remaining residue according to the cleaner’s instructions and dry the cup holder completely.
Can I use vinegar to clean car cup holders?
Vinegar is not automatically safe for every automotive interior material. Its acidity may affect certain finishes, coatings, or nearby materials. A compatible automotive interior cleaner is generally a more predictable choice unless the vehicle manufacturer specifically recommends vinegar for the surface.
Can I use disinfecting wipes on car cup holders?
Some wipes may be suitable for certain hard interior surfaces, but others contain chemicals that can affect coatings, finishes, or rubber. Check the wipe manufacturer’s instructions and the vehicle manufacturer’s cleaning recommendations before use. Avoid allowing liquid from the wipe to collect around electronic components.
How do I clean cup holders without removing them?
Remove loose debris with a vacuum and soft brush. Use a microfiber towel or detailing swab lightly dampened with a suitable cleaner to reach the bottom and corners. Work carefully around seams and electronic controls, and dry the area thoroughly.
How do I remove dried coffee stains from a cup holder?
Use a compatible interior cleaner and a soft microfiber towel. For textured surfaces, a soft detailing brush can help loosen residue. Avoid abrasive tools and repeated aggressive scrubbing, especially on coated or glossy plastic.
Why does my cup holder still feel sticky after cleaning?
There may be residual sugar, cleaner, or grease remaining on the surface. Repeat a gentle cleaning step with a fresh cloth if the material and product instructions permit it. If the surface remains sticky even when clean and dry, the rubber or plastic coating itself may be deteriorating.
Is baking soda safe for cleaning car cup holders?
Baking soda can leave particles and may be abrasive on delicate or glossy finishes. It is not the best default choice for automotive interior surfaces. Use a compatible cleaner and a soft cloth instead.
How can I clean cup holders in a car with electronic controls nearby?
Turn off the vehicle and use a small amount of cleaner applied to a microfiber towel or detailing swab when permitted. Do not spray directly into the console or pour liquid into the cup holder. If liquid has entered an electronic component, stop cleaning and seek appropriate professional assistance.
Final Thoughts
Cleaning car cup holders does not require complicated equipment, but the right technique makes a significant difference. Start by removing loose debris, clean removable inserts separately when appropriate, and use a compatible cleaner with a microfiber towel or soft detailing brush.
For sticky soda, dried coffee, and everyday grime, gentle cleaning in small sections is usually more effective than aggressive scrubbing. Pay particular attention to narrow corners, rubber grooves, and the surrounding console, where residue can easily remain hidden.
Most importantly, control moisture and keep liquids away from electronic components. Dry every surface thoroughly before returning inserts or drinks to the cup holders.
With regular maintenance and prompt attention to spills, you can keep your car cup holders clean, odor-free, and looking their best without damaging the interior.