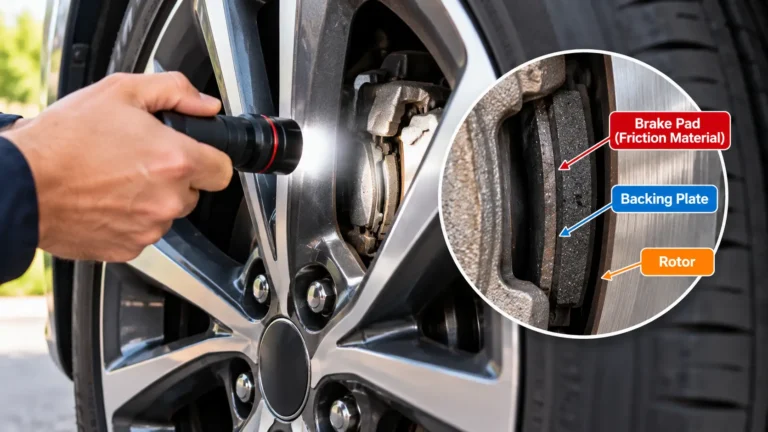
Brake pads can sometimes be checked through the openings in a wheel with a flashlight. Look for the friction material between the pad’s metal backing plate and the brake rotor, then compare its thickness with the minimum specified for your vehicle. A quick visual check can reveal obvious wear, but it may not show the inner pad or the full length of either pad.
If you cannot see the pads clearly, or the brakes are making unusual noises, have a qualified technician inspect them. This guide explains what to look for, how to interpret what you see, and when not to rely on a driveway check.
Before You Check the Brake Pads
Park on a flat surface, shift an automatic transmission into Park or put a manual transmission in the gear specified by its owner’s manual, and apply the parking brake. Turn off the engine and keep the key away from anyone who might start the vehicle.
Allow the brakes to cool before looking closely. Rotors, calipers, and nearby components can become very hot after driving. You do not need to touch them for a visual inspection.
Gather these items:
- A flashlight.
- Your vehicle’s owner’s manual or service information, if available.
- A phone camera for a closer look at hard-to-see areas.
- A brake pad measuring gauge, if you already have one and can use it without reaching into an unsafe space.
Do not crawl under a vehicle supported only by a jack. This check does not require lifting the vehicle or removing a wheel. If a wheel must come off for a proper inspection, have a qualified person use the correct lifting equipment and vehicle-specific procedures.
Find the Rotor, Caliper, and Brake Pads
Look through the openings in the wheel. On a vehicle with disc brakes, the rotor is the large metal disc behind the wheel. The caliper sits over part of the rotor and holds the brake pads against it when you apply the brakes.
Each disc brake assembly generally has an outer pad and an inner pad, positioned on opposite sides of the rotor. The outer pad may be visible through the wheel; the inner pad is often harder to see.
The part you need to assess is the friction material, not the full thickness of the pad assembly. The friction material sits between the metal backing plate and the rotor. Its exposed edge may look like a narrow strip when viewed from the side.
Wheel design varies. Some wheels provide a clear view, while others block the pads almost completely. If you cannot confidently identify the friction material, do not guess based on the thickness of the metal backing plate or the rotor.
How to Check Brake Pads Through the Wheel
1. Shine a Light Toward the Caliper
Aim the flashlight through a wheel opening and locate the caliper where it surrounds the rotor. Move the light to different angles until you can see the edge of the outer brake pad.
A phone photo can help you enlarge the view, but an image may not show depth accurately. Keep your hands, phone, and tools clear of any narrow gaps where they could become trapped.
2. Look for the Remaining Friction Material
Identify the metal backing plate and the layer of friction material beside it. Estimate how much of that layer remains, rather than measuring the backing plate and friction material together.
Look along as much of the pad as you can see. A pad can wear unevenly, so one visible portion may be thicker than another. Check the thinnest visible section, while remembering that an unseen section could be thinner still.
3. Measure Only If You Have a Clear View
A brake pad gauge can help measure the friction material if there is enough access to position it correctly. Do not force a gauge between the pad and rotor or disturb brake components to obtain a measurement.
Compare the measurement with the minimum thickness in the service information for your exact vehicle. The owner’s manual may not list the measurement, in which case a dealer or qualified repair shop can look it up.
If your view is obstructed, the pad edge is unclear, or you cannot place the gauge accurately, treat the result as unknown, not as a pass.
4. Check the Other Visible Wheels
Repeat the visual check at each wheel where the pads are visible. Compare what you can see on the left and right sides of the same axle, but do not assume that all pads wear at the same rate.
A pad that appears substantially thinner than its counterpart deserves professional attention. Uneven wear can have several causes, and a technician needs to inspect the assembly to determine what is happening.
5. Arrange an Inspection If Anything Is Unclear
A thorough inspection may require wheel removal to check both the inner and outer pads and other brake components. A technician can measure the friction material at its thinnest point and compare it with the applicable specification.
This is especially useful when wheel openings hide the pads, when a pad appears tapered, or when you hear a noise that the visual check does not explain.
How Much Brake Pad Material Is Enough?
The best reference is the minimum friction-material thickness specified for your vehicle and brake system. Do not count the metal backing plate as usable pad material.
A small amount of visible material does not guarantee that a pad is safe or that its inner counterpart has the same thickness. For example, if you measure about 3 mm of friction material, arrange a prompt professional inspection rather than assuming you have plenty of time. The vehicle-specific limit and the condition of the other pads still matter.
| What you observe | What to do |
|---|---|
| Pads are clearly visible and appear to have substantial material | Compare an accurate measurement with the vehicle-specific specification; continue routine inspections. |
| Material appears thin or you measure about 3 mm | Arrange a prompt inspection and discuss replacement with a qualified technician. |
| You cannot see or measure the friction material | Have the pads inspected rather than assuming they are in good condition. |
| Grinding, a major change in braking, or a brake warning accompanies the concern | Stop driving when safe and arrange an assessment; towing may be appropriate. |
A single measurement cannot predict exactly how long pads will last. Driving conditions, brake design, and the condition of the rest of the system all affect wear.
Signs Your Brake Pads Need Attention
A visual check is useful, but it should not override symptoms you notice while driving. These signs can point to worn pads or another brake problem:
- Persistent squealing or scraping: Some brake systems use an audible wear indicator, but noise can have other causes. Have persistent or new noise investigated.
- Grinding: A harsh grinding sound can indicate serious brake wear or damage. Stop driving when safe and arrange an inspection rather than trying to finish a trip.
- A warning light or message: Some vehicles monitor pad wear; other brake warnings concern different parts of the system. Check the owner’s manual and have the warning diagnosed.
- Pulling, vibration, or a changed pedal feel: These symptoms do not identify the pads as the cause, but they warrant a brake-system inspection.
- Reduced braking effectiveness: If the vehicle is not stopping normally, stop in a safe place and arrange professional help. Do not rely on a visual pad check to clear the vehicle for driving.
Brief noise after moisture or storage can have different causes from persistent grinding. If you are unsure, a technician can determine whether the brakes need service.
Can You Check the Inner Brake Pad Without Removing the Wheel?
Sometimes, but often the inner pad is difficult to see through the wheel. The outer pad’s condition does not prove that the inner pad has the same amount of friction material.
A phone camera or inspection mirror may improve the view on some vehicles, but do not reach into a tight space or move components to obtain a picture. If the inner pad remains hidden, a wheel-off inspection is the more reliable way to assess it.
What If Your Vehicle Has Drum Brakes?
A vehicle with drum brakes uses brake shoes inside a drum rather than visible pads clamping a disc rotor. Some vehicles have disc brakes on one axle and drums on the other.
You generally cannot assess drum brake shoe material by looking through a wheel opening in the same way. Follow the vehicle’s service information or ask a qualified shop to inspect the drums and shoes. Do not assume that an obscured drum brake has the same pad arrangement as a disc brake.
Common Brake Pad Inspection Mistakes
Measuring the wrong part. The backing plate is metal; the friction material is the layer that wears against the rotor. Including the backing plate makes the pad look thicker than its usable material.
Checking only one pad. The visible outer pad is only part of the picture. Inner and outer pads, as well as pads on opposite sides, can wear differently.
Assuming a quiet brake is a healthy brake. Not every worn pad produces an obvious warning noise. Routine inspections still matter.
Spraying or blowing away brake dust. Do not use compressed air or dry brushing to clean brake assemblies. Avoid disturbing dust during a visual check, and leave cleaning to a shop equipped for brake service.
Adding brake fluid as a substitute for diagnosis. A low fluid level or brake warning can have more than one cause. Follow the owner’s manual and have the system assessed rather than assuming a fluid top-off fixes worn pads or another fault.
How Often Should You Check Brake Pads?
Follow the inspection schedule in your vehicle’s maintenance information. Have the brakes checked sooner if you notice new noise, a warning message, or a change in braking behavior.
A tire rotation or scheduled service can be a convenient opportunity to ask for pad measurements, especially when the wheels are already being removed. Request the remaining friction-material thickness for both inner and outer pads where applicable, along with any concerns about uneven wear.
Choose the Next Step Based on What You Can See
Start with a flashlight and look for the friction material at each visible disc brake. If you can measure it accurately, compare the result with the specification for your vehicle. If the pads are hidden, appear thin, or show uneven wear, arrange a professional inspection rather than relying on an estimate.
If braking performance changes significantly or you hear grinding, stop when safe and get the vehicle assessed before continuing your trip.