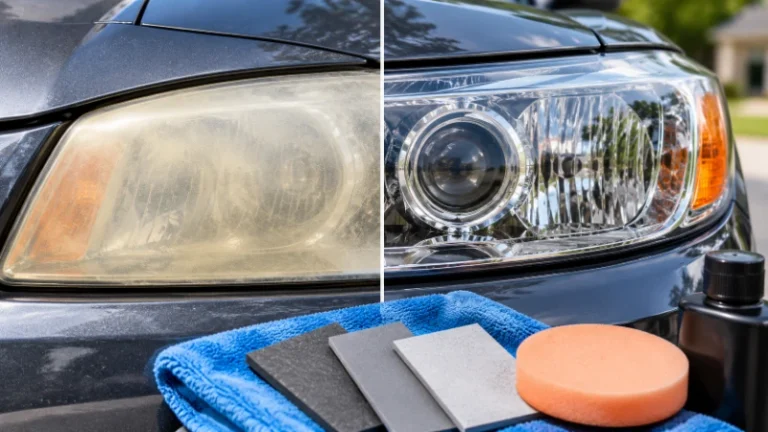
Foggy headlights can often be restored at home using a headlight restoration kit, progressive sanding, polishing compound, and a UV-protective sealant. The process removes the oxidized outer layer of the plastic lens, restores clarity, and protects the newly exposed surface from further UV damage.
If your headlights look yellow, cloudy, or hazy, the problem is usually caused by deterioration of the protective coating on the polycarbonate lens. Household fixes like toothpaste or baking soda may offer a temporary cosmetic improvement, but they do not provide the same lasting results as proper sanding, polishing, and sealing.
This guide explains how to fix foggy headlights at home, what supplies you need, how to restore cloudy lenses step by step, and how to maintain the results. It also covers common mistakes, temporary household remedies, and situations where replacing the headlight assembly may be necessary.
Why Do Headlights Become Foggy or Cloudy?
Most modern vehicle headlights use polycarbonate plastic lenses rather than glass. Polycarbonate is lightweight and impact-resistant, but it is more vulnerable to surface deterioration from prolonged UV exposure.
Manufacturers apply a protective coating to help prevent the plastic from degrading. Over time, sunlight, road debris, environmental contamination, and general aging can wear down this coating.
Once the protective layer deteriorates, the exposed plastic becomes increasingly susceptible to oxidation and surface damage. This creates the yellowish or cloudy appearance commonly associated with aging headlights.
Several factors can accelerate the process:
- UV exposure: Vehicles parked outdoors for extended periods may experience faster deterioration of the headlight coating.
- Environmental conditions: Heat, sunlight, road debris, and changing weather conditions can contribute to surface damage.
- Age: Older headlight lenses are more likely to have worn or degraded protective coatings.
- Poor maintenance: Damaged or deteriorating lenses can become harder to maintain as oxidation accumulates.
Cloudy headlights are more than a cosmetic issue. Significant haze can reduce the amount of light reaching the road and affect nighttime visibility. Restoring the lenses can improve clarity, although the actual improvement in lighting depends on the condition of the lenses and the headlight system.
How to Fix Foggy Headlights at Home: Step-by-Step Restoration
A proper restoration involves removing the damaged outer surface, progressively smoothing the plastic, polishing it, and applying UV protection.
The exact sanding grits, application methods, and curing times depend on the restoration kit you choose. Always follow the manufacturer’s instructions, particularly when the kit includes a specific sanding sequence or chemical coating.
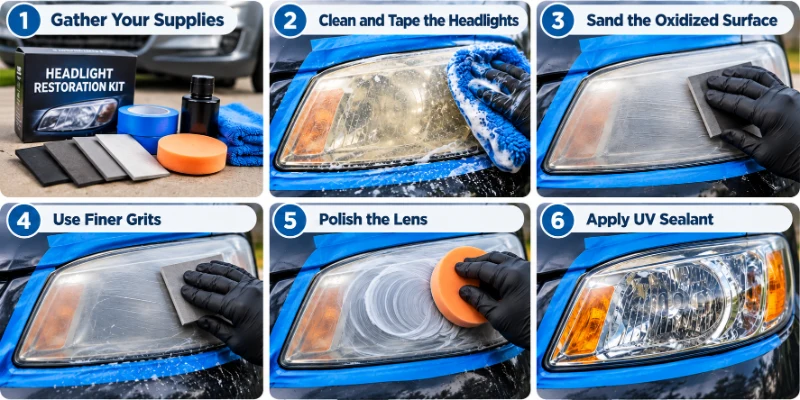
Step 1: Gather the Headlight Restoration Supplies
Before starting, collect the necessary tools and materials.
| Supply | Purpose |
|---|---|
| Headlight restoration kit | Provides the sanding pads, polishing compound, and protective coating needed for restoration. |
| Sandpaper or sanding pads | Removes the oxidized surface and smooths the lens progressively. |
| Spray bottle with water | Provides lubrication for wet sanding when required. |
| Painter’s tape | Protects surrounding paint and trim from accidental sanding. |
| Microfiber towels | Clean and dry the lens during the process. |
| Protective gloves and eye protection | Help protect your skin and eyes during sanding and chemical application. |
Choose a restoration kit intended for automotive polycarbonate headlight lenses. Check whether the kit requires wet sanding, dry sanding, or a combination of both.
Some kits also include a UV sealant or clear protective coating. This final protective layer is essential because sanding removes the deteriorated surface and may leave the newly exposed plastic vulnerable to further UV damage.
Step 2: Wash the Headlight Lens and Protect the Surrounding Area
Park the vehicle in a shaded, well-ventilated area and allow the headlights to cool.
Wash the headlight lenses with automotive car wash soap and water to remove dirt, road grime, and loose contamination. Rinse thoroughly and dry the surrounding area.
Apply painter’s tape around the edges of each headlight lens. Cover nearby painted panels, rubber seals, and trim that could be accidentally contacted by the sandpaper or sanding pad.
Masking is particularly important when working near the edges of the headlight assembly, where sanding can easily damage adjacent paint or trim.
Before proceeding, inspect the lens for cracks, deep damage, internal moisture, or other defects that surface restoration may not correct.
Step 3: Sand Away the Oxidized Surface
Begin with the sanding grit recommended by your restoration kit for the condition of the lens.
For heavily oxidized headlights, some kits use approximately 400-grit sandpaper as the initial step. This coarser grit helps remove the damaged outer layer, although other kits may specify a different starting grit.
If your kit calls for 400-grit sanding:
- Follow the manufacturer’s instructions for dry or wet sanding.
- Work evenly across the lens using controlled, consistent strokes.
- Keep the sanding pattern uniform and avoid concentrating pressure on one spot.
- Continue until the visible oxidation and uneven yellowing have been removed and the surface has a consistent appearance.
The lens may look more uniformly cloudy immediately after this step. That is expected because sanding creates a fine, even texture across the plastic.
Do not attempt to restore clarity by applying excessive pressure or sanding one area aggressively. Uneven sanding can create visible defects and make the final finish more difficult to achieve.
Step 4: Progress Through Finer Sanding Grits
After removing the oxidized layer, move through the finer sanding grits specified by your kit.
A common sanding progression may include approximately 600-grit followed by 1,000-grit or finer sandpaper. However, the correct sequence varies by product, and some kits include additional intermediate grits.
For a kit using this sequence:
- Medium grit: Use approximately 600-grit sandpaper to refine the surface left by the coarser sanding step. Wet sanding may be required.
- Fine grit: Progress to approximately 1,000-grit or the finer grit specified by the manufacturer to reduce the remaining sanding marks.
- Final preparation: Complete the recommended sanding sequence until the lens has a consistent, finely sanded surface ready for polishing.
When wet sanding is required, use clean water as directed to lubricate the surface and help remove sanding residue.
Rinse the lens and sanding pad frequently. Do not skip grits or move to a finer abrasive before the previous sanding marks have been adequately removed.
The goal is to create a uniformly prepared surface, not to make the lens completely clear through sanding alone.
Step 5: Polish the Lens With Clarifying Compound
Once sanding is complete, use the polishing or clarifying compound included with the restoration kit.
Apply the recommended amount to a clean cloth, polishing pad, or compatible buffing attachment. Work the compound evenly across the lens using the method specified by the manufacturer.
The polishing compound helps refine the fine sanding marks and restores optical clarity to the prepared plastic surface.
Continue working in controlled sections and avoid allowing the compound to dry unless the product instructions specifically permit it.
After polishing, remove the remaining compound and residue using a clean microfiber towel. Inspect the lens under good lighting to check for remaining haze, uneven areas, or visible sanding marks.
If the lens is still cloudy, determine whether additional polishing or another restoration step is required before applying the protective coating.
Step 6: Apply the UV-Protective Sealant
Applying a suitable UV-protective coating is one of the most important parts of a lasting headlight restoration.
Sanding removes the deteriorated outer surface, but it can also remove or compromise the original factory protective coating. The newly exposed plastic needs suitable protection against further UV deterioration.
Once the lens is fully prepared, clean and dry it according to the restoration kit’s instructions.
Apply the supplied UV sealant or clear protective coating in the specified manner. Use the recommended amount and application technique, keeping the coating even across the lens.
Avoid applying excessively thick or uneven layers, as these can leave streaks, bubbles, or an inconsistent finish.
Allow the coating to cure for the full period specified by the manufacturer. Keep the vehicle dry and avoid touching or disturbing the treated surface during curing.
Do not assume that every restoration kit has the same curing time or that the vehicle can immediately be driven in wet conditions. Follow the instructions for the specific product you use.
After curing, inspect both headlights to confirm that the lenses are clear and the protective coating has an even finish.
Do Household Headlight Restoration Hacks Actually Work?
Household products such as toothpaste, baking soda, and vinegar mixtures are often suggested as inexpensive ways to clean cloudy headlights.
These methods may provide a mild, temporary cosmetic improvement on lightly hazed lenses. Their abrasive action can sometimes polish a very thin layer of surface contamination or oxidation.
However, household remedies do not reliably remove the full deteriorated surface or replace the UV-protective coating needed after restoration.
The limitations include:
- Limited correction: Household abrasives may not remove moderate or heavy oxidation.
- No reliable UV protection: Toothpaste and baking soda do not provide a purpose-made protective coating for newly exposed polycarbonate.
- Inconsistent results: The improvement depends on the condition of the lens and the product or technique used.
- Recurring haze: Without suitable protection, the surface may become cloudy again as UV exposure continues.
For very light surface haze, a household method may provide a small cosmetic improvement. However, it should not be considered a substitute for a proper restoration kit when the lenses are significantly yellowed or oxidized.
A dedicated kit with compatible sanding materials, polishing compound, and UV protection is the more appropriate approach for moderate to heavy surface deterioration.
How Long Does Headlight Restoration Last?
A properly completed restoration with a suitable UV-protective coating may last approximately one to two years before noticeable haze begins returning. Actual durability varies according to the coating used, application quality, climate, and the amount of direct sunlight the vehicle receives.
Vehicles parked outdoors in strong sunlight may experience faster deterioration than vehicles regularly kept in a garage or shaded area.
The quality and condition of the protective coating also matter. A poorly applied sealant or an incomplete sanding process can reduce the durability of the restoration.
To help maintain the results:
- Park in a garage or shaded area whenever practical.
- Keep the headlight lenses clean and remove surface contamination regularly.
- Use a compatible UV maintenance product if recommended by the coating manufacturer.
- Inspect the lenses periodically for early signs of returning haze.
- Follow the maintenance instructions for the specific protective coating.
A maintenance product may help preserve an existing protective layer, but it cannot reverse significant oxidation or replace a deteriorated coating. If the lenses become noticeably cloudy again, a more complete restoration may be necessary.
Common Headlight Restoration Mistakes to Avoid
The quality of a headlight restoration depends on preparation, consistent sanding, careful polishing, and correct application of the protective coating.
Avoid these common mistakes:
Skipping Sanding Grits
Moving directly from a coarse abrasive to a much finer grit can leave deeper sanding marks behind. Fine sandpaper may not remove those marks efficiently, resulting in a cloudy or uneven finish.
Follow the sanding sequence recommended by your kit and make sure each stage adequately refines the previous one.
Applying Too Much Pressure
Aggressive sanding can remove too much material from one area or create uneven results.
Use controlled, consistent strokes and avoid concentrating pressure on edges or isolated spots. Follow the kit’s instructions for the sanding method and pressure.
Forgetting to Protect the Paint
Sanding pads and abrasive materials can scratch nearby painted panels, trim, or rubber seals.
Use painter’s tape to protect the surrounding surfaces before beginning. Take extra care around curved edges and narrow gaps.
Applying Sealant Before the Lens Is Ready
Dust, polishing residue, moisture, and incomplete preparation can interfere with the appearance and application of the protective coating.
Make sure the lens is prepared and cleaned according to the kit’s instructions before applying the sealant.
Applying the Coating Too Thickly
An overly thick or uneven coating may leave streaks, bubbles, or visible imperfections.
Use the application method and quantity specified by the manufacturer. Allow the coating to cure fully before exposing it to water or disturbing the surface.
Ignoring Internal Damage
Surface sanding and polishing cannot correct every headlight problem.
Cracked lenses, internal condensation, damaged reflectors, or internal discoloration may require repair or replacement of the headlight assembly.
Identify the source of the problem before investing time in a surface restoration.
When Should You Replace a Headlight Instead of Restoring It?
A headlight restoration kit is generally suitable for surface oxidation and exterior haze on an otherwise intact lens. Replacement may be necessary when the problem extends beyond the outer plastic surface.
Consider professional inspection or replacement if you notice:
- Cracks or structural damage: Cracked lenses may allow moisture to enter and cannot be repaired through ordinary surface sanding.
- Internal condensation or water: Moisture inside the headlight assembly suggests a sealing or housing problem that exterior polishing will not resolve.
- Internal haze or discoloration: Cloudiness on the inside of the lens cannot be removed by sanding the exterior.
- Damaged reflectors or lighting components: Surface restoration will not repair a damaged reflector, bulb, LED module, or other internal component.
- Persistent lighting problems: If the headlights remain dim or uneven after the lenses are clear, the issue may involve the lighting system rather than the lens surface.
For vehicles with severe lens damage or unresolved lighting problems, a qualified automotive technician can help determine whether the assembly needs repair or replacement.
Frequently Asked Questions
Is toothpaste a long-term fix for foggy headlights?
No. Toothpaste may provide a temporary cosmetic improvement on lightly hazed headlights, but it does not reliably remove the full oxidized layer or provide a durable UV-protective coating.
A proper restoration kit is more suitable for moderate to heavy oxidation because it combines surface preparation, polishing, and protective sealing.
Can cloudy headlights affect nighttime driving visibility?
Yes. Significant haze and oxidation can reduce the amount of light passing through the headlight lenses, potentially affecting nighttime visibility.
Restoring the lenses may improve clarity and light transmission when exterior oxidation is the cause. However, restoration does not guarantee a specific improvement in beam output or repair problems within the lighting system.
How often should headlights be restored?
A properly restored headlight with a suitable UV-protective coating may remain clear for approximately one to two years, although actual durability varies with exposure, maintenance, and coating quality.
Inspect the lenses periodically and follow the coating manufacturer’s maintenance recommendations rather than relying on a fixed restoration schedule.
Is a headlight restoration kit better than replacing the assembly?
For headlights affected by exterior oxidation or surface haze, a restoration kit is often a less involved option than replacing the entire assembly.
Replacement may be more appropriate for cracked lenses, internal moisture, damaged reflectors, or internal defects that cannot be corrected through surface restoration.
Can you restore headlights without sanding?
Very light haze may improve with a suitable plastic polish, depending on the lens condition and product instructions.
For moderate to heavy oxidation, progressive sanding is often needed to remove the deteriorated outer surface before polishing and applying a new protective coating. Polish-only methods may not adequately correct deeper surface deterioration.
Does headlight restoration improve brightness?
Restoring a cloudy exterior lens can improve the amount of light transmitted through the lens when oxidation is restricting light output.
However, the actual improvement depends on the condition of the lens, bulb or lighting system, reflector, and headlight alignment. Restoration does not fix faulty bulbs, damaged reflectors, or other internal lighting problems.
Final Thoughts
Fixing foggy headlights at home is possible when the problem is limited to exterior oxidation and surface haze. A suitable restoration kit, careful sanding, polishing compound, and a compatible UV-protective coating can restore clarity and help prevent the haze from returning too quickly.
The most important steps are to follow the recommended sanding sequence, protect the surrounding paint and trim, and apply the protective coating correctly.
Household remedies may offer a temporary cosmetic improvement, but they are not a dependable replacement for a complete restoration. If the lens is cracked, cloudy on the inside, or affected by internal damage, professional inspection or replacement may be necessary.
With careful preparation and appropriate maintenance, a properly restored headlight can remain clearer for an extended period and help maintain the vehicle’s exterior appearance and lighting performance.