The best headlight restoration kits for cloudy headlights remove appropriate surface deterioration and provide a way to protect the prepared lens. Buying polish alone may improve the appearance, but the final protection and application process deserve equal attention.
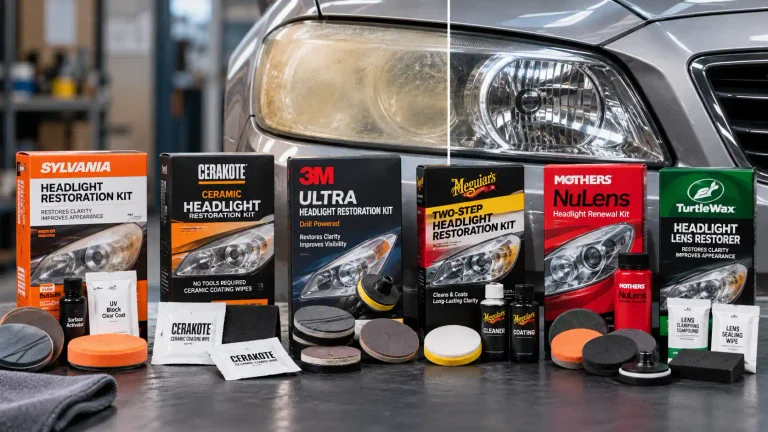
This guide compares six individual kits, including hand-restoration systems, drill-driven abrasives, ceramic wipes, clear coats, and a polish-based maintenance package. The right choice depends on the lens condition, required equipment, and the method you can complete correctly.
These are research-based reviews, not hands-on sanding, light-output, or durability tests. We have not measured which kit restores the most light or lasts longest, and manufacturer protection claims are identified as claims.
How We Chose These Kits
We compared verified contents, hand versus drill requirements, correction stages, included final protection, application demands, reuse possibilities, and limits. We distinguished dedicated clear coats and ceramic wipes from polish containing protective polymers.
Awards describe editorial fit for a buyer. We did not independently verify maximum protection life, warranty outcomes, or comparative light-output improvements. Check the exact kit number, contents, supplied instructions, seller, and current offer before ordering.
This article contains affiliate links. If you buy through them, we may earn a commission at no extra cost to you.
Quick Kit Comparison
| # | Product | Best For / Category | Amazon |
|---|---|---|---|
| 1 | SYLVANIA Headlight Restoration Kit | Best Complete Hand-Restoration Starting Point | Check Price on Amazon |
| 2 | CERAKOTE Ceramic Headlight Restoration Kit | Best Hand Kit With Ceramic Coating Wipes | Check Price on Amazon |
| 3 | 3M Ultra Headlight Restoration Kit 39195 | Best Drill-Based Abrasive Sequence | Check Price on Amazon |
| 4 | Meguiar’s Two-Step Headlight Restoration Kit G2970 | Best Simplified Cleaning-and-Coating Process | Check Price on Amazon |
| 5 | Mothers NuLens Headlight Renewal Kit 07251 | Best Drill-Polish and Maintenance Package | Check Price on Amazon |
| 6 | Turtle Wax Headlight Lens Restorer Kit T-240KT | Best Compact Manual Restoration Package | Check Price on Amazon |
Our Top Picks
1. Best Complete Hand-Restoration Starting Point — SYLVANIA Headlight Restoration Kit
Best for: Owners wanting a staged hand process with a dedicated UV-blocking clear coat.
SYLVANIA’s kit is our research-based starting choice for a restorable externally hazy plastic lens when you prefer hand work. Its package includes a surface activator, sanding materials, clarifying compound, and a UV-blocking clear coat rather than relying only on polish for the final result.
That separation is useful because removing deterioration and protecting the prepared lens are different tasks. Follow the staged process, inspect the sanding result, and prepare the surface as directed before applying the coating. Do not improvise extra polish or wax between stages if the system does not call for it.
The manufacturer describes the kit as sufficient for two headlight assemblies. Unusual lens size or condition can affect consumption, so check the package and instructions before assuming one kit covers additional lamps. Plan the coating’s drying and curing period before driving, washing, or exposing the job to unsuitable conditions.
The tradeoff is manual effort and attention to each stage. This kit does not fix internal moisture, deep structural cracks, or a damaged reflector. Choose it for a complete supported surface-restoration process, not a promise that every cloudy headlight becomes equivalent to a new assembly.
Key Features
- Surface activator, sanding materials, and clarifying compound.
- Dedicated UV-blocking clear-coat stage.
- Hand-restoration format without a powered drill requirement.
- Manufacturer describes coverage for two headlight assemblies.
Pros
- Includes correction and a separate protection step.
- Suitable buying format for owners without a drill.
- Structured process is easier to plan than polishing alone.
Cons
- Hand sanding requires effort and consistent coverage.
- Coating preparation and curing must be followed carefully.
- Cannot correct internal or structural lamp damage.
Buying Decision
Choose SYLVANIA if you want a complete hand process with a dedicated UV clear coat. Choose 3M Ultra if you prefer drill-driven abrasive work and can control it safely.
2. Best Hand Kit With Ceramic Coating Wipes — CERAKOTE Ceramic Headlight Restoration Kit
Best for: Owners who prefer a hand-applied oxidation-removal, sanding, and ceramic-wipe system.
CERAKOTE uses three stages: oxidation-removing wipes, supplied sanding materials, and ceramic coating wipes. The linked package lists eight oxidation-removing wipes and two ceramic coating wipes, with no power tools required.
The reason to consider it is the complete wipe-and-hand-preparation workflow. Each stage serves a different role, so do not skip sanding simply because the first wipes improve the appearance. Likewise, a lens that looks temporarily clear while wet is not proof that surface preparation is finished.
Follow the supplied sequence and the instructions for rinsing, drying, and coating application. Keep the final surface free from inappropriate polishing residue or contamination. Arrange the job around the coating’s required conditions rather than planning to wash or expose it immediately afterward.
CERAKOTE makes a long-term coating guarantee; treat that as a manufacturer warranty proposition with conditions, not independently measured durability in this guide. The kit’s appeal is an included ceramic protection step and a no-drill process. The limitation is that preparation quality and the lens’s underlying condition still govern the result.
Key Features
- Eight oxidation-removal wipes in the linked kit.
- Sanding materials included.
- Two ceramic coating wipes for the final stage.
- No power tools required.
- Manufacturer coating guarantee is subject to its terms.
Pros
- Correction and protection materials are supplied together.
- No drill purchase or powered-tool handling.
- Prepackaged wipes make the stages easy to distinguish.
Cons
- Hand preparation can still take time and effort.
- Coating wipes must be applied under the specified conditions.
- Guarantee language is not a universal measured lifespan.
Buying Decision
Choose CERAKOTE when you want a hand process with ceramic wipes. Choose SYLVANIA if you prefer its activator, compound, and UV-clear-coat sequence; neither should be selected for an internally damaged lamp.
3. Best Drill-Based Abrasive Sequence — 3M Ultra Headlight Restoration Kit 39195
Best for: Owners with a suitable household drill who want staged abrasive correction on restorable plastic lenses.
3M Ultra 39195 provides a staged abrasive package rather than a polish-only approach. The linked kit includes a disc holder, P500 and P800 sanding discs, a P3000 Trizact refining disc, masking tape, and Quick Headlight Clear Coat materials.
This kit is relevant when the lens needs deliberate surface correction and you are comfortable controlling the drill. Follow the instructions for speed, contact, pressure, and dry or wet stages. A moving abrasive can damage nearby paint or unevenly work an edge if it is handled carelessly.
The final clear-coat materials distinguish this package from other 3M kits that may have different contents. Verify product number 39195 and the actual pack rather than ordering any listing with “3M headlight restoration” in its title. A generic title mentioning wax does not replace checking the supplied final coating.
Buy Ultra for the specified staged system, not an unsupported claim that drill use always produces better results. Severe lens damage can exceed what sanding should remove, and internal deterioration is outside the kit’s role. A drill helps drive the process; it does not replace correct preparation and coating.
Key Features
- Disc holder and P500/P800 abrasive stages.
- P3000 Trizact refining disc.
- Masking tape and final clear-coat materials in the verified package.
- Drill-based format requires a suitable drill separately.
- Intended for appropriate plastic-lens surface restoration.
Pros
- Defined abrasive progression supports deliberate correction.
- Includes final protection materials in this package.
- Useful for owners already comfortable with a drill.
Cons
- Drill is not included.
- Powered abrasion increases handling demands around paint and lens edges.
- Requires checking the exact kit contents and completing every stage.
Buying Decision
Choose 39195 if you want drill-driven correction and can follow the full process. Choose a hand kit if controlled manual work is more comfortable or you do not already own the required drill.
4. Best Simplified Cleaning-and-Coating Process — Meguiar’s Two-Step Headlight Restoration Kit G2970
Best for: Owners seeking a hand-applied cleaning-compound and coating system without a separate multi-grit disc progression.
Meguiar’s G2970 pairs cleaning compound and abrasive pads with a headlight coating. Its useful distinction is the two-stage format: prepare the surface by hand, then apply the coating as directed.
The “no sanding or drill” description should not be read as “no abrasion.” The supplied pads and compound perform surface cleaning and correction. Work evenly and inspect the result rather than treating the first cleaner application as a guaranteed fix for all deterioration.
Meguiar’s publishes protection up to a year for its coating under suitable conditions. That is a manufacturer claim, not a tested promise for every vehicle or environment. Preparation, exposure, and maintenance affect the practical result, and the coating still needs the specified application and curing process.
Choose this kit when a simpler hand workflow matches the lens condition and your comfort level. If the instructions’ cleaning stage cannot adequately prepare a badly degraded lens, stop and reassess whether a different restoration method or replacement is appropriate.
Key Features
- Cleaning compound with abrasive hand pads.
- Separate headlight-coating stage.
- No powered drill required.
- Two-stage process instead of separate multi-grit disc steps.
- Manufacturer protection claim up to one year, subject to conditions.
Pros
- Straightforward process for buyers avoiding a drill.
- Includes a dedicated final coating.
- Easy to distinguish preparation from protection.
Cons
- Abrasive pads still require controlled, even use.
- Not a guaranteed solution for severe deterioration.
- Maximum advertised protection life is not assured.
Buying Decision
Choose G2970 if its cleaning-and-coating process fits a restorable lens and you want a simpler hand approach. Choose a staged sanding kit when the lens and instructions call for that level of correction.
5. Best Drill-Polish and Maintenance Package — Mothers NuLens Headlight Renewal Kit 07251
Best for: Owners wanting a drill-driven polishing tool and a polymer-containing maintenance polish.
Mothers NuLens combines the PowerBall 4Lights polishing tool, a three-inch backing plate, restoration discs, and eight ounces of PowerPlastic 4Lights polish. That makes it a relevant purchase for an owner who wants a powered polishing setup and a product for ongoing compatible lens maintenance.
The polish leaves an oxidation-inhibiting polymer layer according to Mothers. This is a different finishing approach from the dedicated coating wipes or clear-coat stages in several kits above. Do not assume all protective finishes have the same mechanism or independently verified lifespan.
Use the discs and polishing tool only as the instructions permit for the lens condition. Mask surrounding surfaces and control the drill carefully. The included liquid volume can support later maintenance, but consumed discs and changing lens condition still affect what can be reused.
Buy NuLens for its tooling and polish-based process. If your main priority is a separate final coating supplied in the box, SYLVANIA, CERAKOTE, 3M Ultra, or Meguiar’s offers a clearer fit for that requirement.
Key Features
- PowerBall 4Lights polishing tool.
- Three-inch backing plate and restoration discs.
- Eight-ounce PowerPlastic 4Lights polish.
- Manufacturer-described oxidation-inhibiting polymer finish.
- Suitable drill is needed separately.
Pros
- Combines correction tools with a maintenance-polish supply.
- Useful to buyers already using controlled drill polishing.
- Distinct alternative to single-job coating-wipe packages.
Cons
- Drill not included.
- Polish-based finish should not be equated with every cured coating.
- Tool control matters around paint and lens edges.
Buying Decision
Choose NuLens if you want its powered polishing tools and plan appropriate ongoing maintenance. Choose a kit with a dedicated coating stage if that is the protection approach you want.
6. Best Compact Manual Restoration Package — Turtle Wax Headlight Lens Restorer Kit T-240KT
Best for: Owners wanting a compact hand kit with compound, sanding materials, and a sealing step.
Turtle Wax T-240KT brings together clarifying compound, sanding materials with lubricant, and sealing wipes. It is a practical manual option for suitable exterior haze when you want a compact package rather than buying a powered tool.
Follow the instructions for when to use the abrasive stages and how to move through them. More rubbing is not automatically better, and extra sanding without a clear plan can leave preparation marks. Complete the sealing step after the surface is ready instead of stopping as soon as the lens looks clearer.
Check the exact package contents because restoration kits and wipe presentations can change. The sealing materials are part of the final process; generic polish or wax should not be substituted without appropriate guidance. Plan the required dry conditions and waiting period after application.
Choose Turtle Wax for a compact hand-restoration workflow. Its limitation is shared with other DIY kits: the problem must be on a restorable outer surface. Cracks, internal moisture, or a deteriorated lamp interior require a different repair.
Key Features
- Clarifying compound.
- Manual sanding materials and lubricant.
- Final sealing wipes in the linked package.
- No drill required for the hand process.
- Compact package for a staged surface-restoration job.
Pros
- Correction and sealing components supplied together.
- Manual format avoids power-tool setup.
- Useful alternative for a limited exterior-haze job.
Cons
- Hand work requires patience and consistent coverage.
- Package presentation should be confirmed before buying.
- Does not repair internal or structural damage.
Buying Decision
Choose T-240KT if you want its compact manual process and will complete the sealing stage. Choose a drill kit if its method fits the lens and you already have suitable tools.
Can a Restoration Kit Fix Your Cloudy Headlights?
A kit is relevant when the haze or yellowing is on the outside of a compatible restorable plastic lens. Wash and inspect the lens first, then distinguish surface deterioration from moisture inside the lamp, deep cracks, or damage to internal components.
Restoration does not repair a failed seal, restore a damaged reflector, correct electrical faults, or fix aim. It also does not guarantee that the assembly will perform like a new headlight. Persistent poor lighting needs assessment of the complete lamp system rather than repeated sanding.
Preparation and protection form one process. Abrasive correction can remove degraded surface material and existing protection, so complete the kit’s finishing step. Do not assume ordinary paint wax is equivalent to the specified headlight coating.
Buying Guide: Choose a Complete Process for Your Lens
The best headlight restoration kit depends on your headlight’s condition, the tools you have, and the type of protective finish included. Look for a kit that addresses exterior oxidation or yellowing, provides suitable cleaning or polishing materials, and includes a finishing step to help protect the restored plastic lens.
Diagnose the Cloudiness Before Shopping
Exterior oxidation is different from condensation inside a lamp. Deep cracks, internal deterioration, or damaged seals can make restoration the wrong purchase. Check where the problem is and whether the lens is an appropriate plastic surface for the product.
If the assembly is damaged or the lighting remains poor for other reasons, address those issues directly. A clearer outer lens does not establish that bulbs, wiring, reflectors, and aim are functioning correctly.
Choose Hand Work or a Drill Based on Control
Hand kits avoid buying a drill and let you work deliberately around curves and edges. They still need consistent coverage, enough effort, and attention to each stage. “No power tools” does not mean the process contains no abrasion.
Drill kits can assist abrasive or polishing work, but they bring control requirements. Masking, speed, pressure, movement, and the lens shape all matter. Choose powered work because you can follow the method comfortably, not because a drill is assumed to produce a better result automatically.
Check What Protects the Lens After Correction
SYLVANIA includes a UV-blocking clear coat; CERAKOTE supplies ceramic coating wipes. The reviewed 3M Ultra and Meguiar’s packages also include dedicated finishing-coating materials. Turtle Wax includes a sealing stage, while Mothers describes protective polymers within its polish.
These finishes should not be treated as identical. Choose a kit that supplies the protection approach you intend to use, and finish exactly as directed. If you select polish-based maintenance, plan its upkeep instead of assuming every restoration process leaves the same long-term protection.
Read Warranty and Durability Claims Carefully
A lifetime coating guarantee is a manufacturer commitment with conditions, not proof that every prepared lens remains unchanged forever. “Up to a year” likewise describes a maximum claim rather than a fixed maintenance interval for every car.
Review registration, preparation, coverage, and remedy terms where relevant. Sun exposure, environment, contamination, and the quality of preparation affect the practical outcome. This guide does not rank the kits by measured durability.
Confirm the Required Extra Tools
Drill packages require a suitable drill; hand kits may still need water, cleaning materials, masking, drying towels, and a suitable work area. Do not assume a high piece count means every item required by the instructions is included.
Check coverage for your lens size and the number of assemblies. Consumable abrasives and wipes are not endlessly reusable. A bottle of polish that remains after the first job does not mean the entire kit is ready for a second full restoration.
Plan Conditions and Curing Before Starting
Choose a work period that meets the product’s temperature, ventilation, drying, and curing requirements. Do not begin coating just before expected rain, washing, or another condition the instructions prohibit.
Different kits have different surface preparation and final application rules. Do not mix stages from unrelated systems by habit. Residual polish, moisture, or contamination can affect the next step, so follow the sequence supplied with the chosen kit.
How to Restore Appropriate Cloudy Headlights
To restore cloudy headlights, first confirm that the haze or yellowing affects the outer plastic lens. Clean the surface, protect surrounding paint, and use the sanding or polishing materials specified by your restoration kit. Finish with the supplied protective coating or sealant and allow it to cure according to the manufacturer’s instructions.
- Inspect and confirm suitability. Identify exterior deterioration and check for cracks, internal moisture, or other damage that needs a different repair.
- Read the full instructions before starting. Gather the required tools, protective equipment, water, masking, and a suitable workspace.
- Wash and mask as directed. Remove dirt before abrasion and protect nearby surfaces. Follow the product’s method rather than relying on a generic grit sequence.
- Complete the preparation stages in order. Use the specified chemical, pads, discs, or compound with the required wet or dry method. Keep contact controlled and inspect the finish between stages.
- Prepare for the final protection step. Clean, rinse, and dry exactly as directed. Do not add an unrelated polish, solvent, or wax before coating.
- Apply the supplied finish. Use the stated amount and technique for the clear coat, ceramic wipe, sealant, or polish-based process.
- Allow the required conditioning period. Keep the surface within the product’s restrictions before exposure or use.
- Inspect the lens and lamp function. Evaluate the final appearance and address remaining lamp problems separately. If lighting still seems inadequate, have the system assessed.
Stop when the damage appears unsuitable for the process. Continuing to remove material is not a universal remedy for a crack, deep deterioration, or a cloudy internal surface.
Common Restoration Mistakes
Common headlight restoration mistakes include skipping sanding stages, applying a protective coating incorrectly, relying on household abrasives, and trying to repair internal damage with exterior polishing. These mistakes can leave the lens cloudy, produce an uneven finish, or shorten the effectiveness of the restoration. Following the complete kit instructions helps prevent avoidable problems.
Stopping After the Lens Looks Clear While Wet
Liquid can temporarily change how a hazy surface looks. Inspect at the stages and conditions specified in the instructions rather than treating wet clarity as the final result. Complete the preparation and protection process.
Skipping an Abrasive Stage or Mixing Systems
Each stage has a purpose within the chosen kit. Jumping from one stage to an unrelated compound or coating can leave marks or preparation residue the next product does not expect. Follow one complete supported process.
Skipping the Protective Finish
Correction alone is incomplete when the kit calls for a coating or sealing step. Apply the supplied finish to the correctly prepared surface. Do not assume regular detailing wax provides equivalent protection.
Treating Toothpaste as a Complete Kit
A household abrasive is not a defined restoration-and-protection system. It does not supply an appropriate headlight coating or diagnose the damage. Choose a kit whose preparation, compatibility, and final finish are specified.
Repeatedly Sanding a Lamp With Internal Problems
Outer-surface correction cannot remove moisture behind the lens or repair internal components. Diagnose the location of the cloudiness before each treatment. Repeating the wrong process adds effort without solving the cause.
Which Headlight Restoration Kit Should You Buy?
Choose SYLVANIA for a complete hand process with a UV-blocking clear coat. Choose CERAKOTE for a no-drill sequence ending with ceramic coating wipes. Choose 3M Ultra 39195 when its drill-driven abrasive progression fits the lens and your skill level.
Choose Meguiar’s G2970 for its simpler cleaning-and-coating workflow, Turtle Wax T-240KT for a compact manual system, or Mothers NuLens when you want its powered polishing tools and polish-based maintenance approach.
Buy only after confirming the cloudiness is on a restorable outer surface. Complete the final protection step and assess any remaining lighting problems separately.
Frequently Asked Questions
What is the best headlight restoration kit for beginners?
SYLVANIA is our research-based starting choice for a complete hand process, while CERAKOTE is a relevant alternative for a ceramic-wipe system. The lens must be suitable, and both require following all preparation and finishing steps.
Do I need a drill to restore headlights?
No. Several kits here use hand-applied pads, sanding materials, compounds, and coatings. The reviewed 3M Ultra and Mothers packages are relevant to buyers with a suitable drill.
Can restoration fix moisture inside a headlight?
No. An exterior kit does not repair internal moisture or a failed seal. Have the cause assessed instead of sanding the outside to address condensation.
How long will restored headlights stay clear?
There is no reliable universal period. Preparation, final protection, environment, and maintenance affect the result. Manufacturer maximum-duration and warranty claims should be read with their conditions.
Are clear-coat wipes and protective polish the same?
No. They are different finishing approaches with different instructions. Do not assume they provide identical durability or substitute one for the other within a kit’s process.
Can I use these kits on glass headlights?
Do not assume so. The reviewed systems are intended primarily for compatible plastic-lens restoration. Check the actual lens material and the kit’s instructions before use.
Will the kit restore factory light output?
That cannot be guaranteed. A cleaner outer lens may improve clarity, but the lamp’s internal condition, bulbs, electrical system, and aim also affect output. This guide does not report measured light-output tests.
Can I wash the car immediately after restoration?
Follow the final coating or sealant’s specified waiting period and exposure limits. Immediate washing can conflict with the required drying or curing process. Check the received instructions rather than applying one timing rule to all six kits.