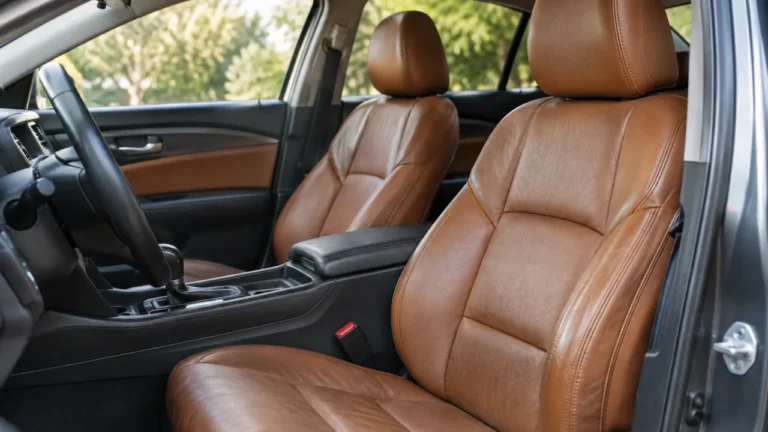
Leather car seat restoration starts with identifying the material and the damage. A gentle cleaning may bring a dirty seat back to life, but worn color, cracked finishes, and torn leather need different repairs. Conditioner alone will not replace missing color or mend a split.
For a small area of finish wear, a leather repair kit matched to your seat may be an option. For deep cracks, damaged seams, or wear near a side airbag, an automotive upholstery professional is the safer choice. Here is how to assess the seats, clean them, and decide whether a repair is suitable for a do-it-yourself job.
Before You Start: Identify the Seat Material
Check the owner’s manual or upholstery information before choosing a cleaner or repair product. Some vehicles use leather on the seating surfaces and a different material on the sides or back. Others use synthetic upholstery throughout, even if it looks like leather.
Many automotive leather seats have a protective surface coating. Suede-like materials, including nubuck, need different care and should not be treated with a standard smooth-leather repair kit unless the product specifically allows it. If you cannot identify the material, ask the vehicle manufacturer or an upholstery specialist before proceeding.
Work in a shaded, ventilated area and let hot seats cool. Remove loose objects from the seats, and check the care instructions for any cleaner, conditioner, or repair kit you plan to use. Those instructions take priority over a general method, especially for preparation, drying, and cure times.
Decide What Needs Restoring
Look at the seats in good light after removing loose items. The type of damage determines whether cleaning is enough or whether the surface needs repair.
- Dirt and body oils: A dull or shiny-looking area may be buildup rather than damage. Clean it first before deciding that the color has worn away.
- Light creases: Normal folds in the material may remain visible after cleaning. A surface product cannot make stretched leather look new again.
- Color loss: A lighter area on a bolster may indicate that the colored finish has worn. It may need a color-matched finish repair.
- Cracking or peeling: Cracks limited to the surface finish may be repairable, but splits that extend into the material need a different approach.
- Holes, open seams, or exposed padding: These are upholstery repairs, not routine conditioning jobs. A patch or replacement panel may be needed.
Pay particular attention to the outer seat bolster, where people slide in and out. If the material is thin, brittle, or tearing under light pressure, do not scrub or flex it to test its limits. Have an upholsterer assess it instead.
What You Need
Start with cleaning supplies. Buy a repair kit only after you can see the cleaned surface and confirm that the kit is suitable for the upholstery and damage.
For cleaning:
- A vacuum with a soft brush attachment.
- Clean, soft microfiber cloths.
- A cleaner approved for the seat material.
- A soft detailing brush, if the cleaner’s directions permit one.
For an optional finish repair:
- A repair product made for the identified upholstery and type of damage.
- A color matched as closely as possible to the seat.
- The applicators and preparation materials specified by the repair product.
Keep separate cloths for cleaning and drying so you do not spread loosened dirt back over the seat. Avoid improvising with household solvents, abrasive pads, or a strong all-purpose cleaner. A product that removes a stain can also damage the seat’s color or protective finish.
How to Restore Leather Car Seats
Begin with the least aggressive cleaning method allowed by the upholstery and cleaner instructions. Only move on to a finish repair if the cleaned, dry seat still shows damage that the repair product is designed to address.
1. Vacuum the Seat and Seams
Use the soft brush attachment to remove loose dirt from the seat surface, backrest, and bolsters. Work gently along seams and between cushions without dragging a hard nozzle across the leather.
Move the seat as needed to reach accessible areas, but do not force the nozzle into tight gaps. Grit left on the surface can act like an abrasive when you wipe, so this step matters even when the seat does not look particularly dirty.
2. Test the Cleaner in a Hidden Spot
Choose a small, inconspicuous area of the same material and follow the cleaner’s test instructions. Let the spot dry so you can check for discoloration, an altered sheen, or a sticky feel before treating the visible seat.
If the test changes the finish, stop and choose another product approved for that upholstery. A successful test reduces the risk of a visible problem, but it does not guarantee that every worn area will respond the same way.
3. Clean a Small Section at a Time
Apply the approved cleaner as directed, usually to a cloth or applicator if the instructions call for it. Wipe gently instead of soaking the seat. If the product permits a soft brush, use light pressure and let the cleaner do the work.
Lift away loosened dirt with a clean cloth, then follow the product’s directions for removing any residue. Change or turn the cloth as it becomes dirty. Clean the whole panel rather than concentrating on one spot for too long, which can leave an uneven appearance.
Take extra care around perforations, seams, controls, and openings. Do not flood these areas or use a wet extractor unless the vehicle and equipment instructions specifically permit it. Moisture trapped in a seat can be difficult to remove and may affect components beneath the upholstery.
4. Let the Seat Dry and Inspect It Again
Allow the upholstery to dry naturally according to the cleaner’s instructions. Do not use a heat gun or hair dryer to speed up the process; concentrated heat can damage upholstery or its finish.
Once the seat is dry, inspect it from several angles. If the color and texture look even and the seat feels clean, further restoration may not be necessary. If a light patch, peeling finish, or crack remains, identify the damage before choosing the next step.
A stain that does not improve is not a reason to scrub harder or mix cleaners. Recheck the material and product directions. For a persistent stain on valuable or delicate upholstery, ask a specialist to assess it rather than risking a larger damaged area.
5. Decide Whether to Condition or Repair
Use a conditioner only if it is appropriate for the seat material and consistent with the vehicle’s care instructions. Apply it as directed, remove any excess, and allow the seat to dry before use. A slick or greasy coating is not the goal and can transfer to clothing.
Conditioning and finish repair do different jobs. A suitable conditioner may help maintain the surface, but it cannot rebuild missing coating, recolor a faded patch, close a tear, or repair stitching. If the finish is missing, choose a compatible repair method rather than adding layers of conditioner.
6. Prepare a Small Finish Repair
A DIY color repair is most practical on a small area of surface wear where the underlying upholstery is intact. Confirm that the kit is intended for the seat material and that its color is a close match. Test the color and finish in a hidden area before working on the visible damage.
Follow the kit’s preparation instructions exactly. Some products require a particular cleaner or surface preparation method; do not assume that an aggressive solvent or sanding is necessary. Mask nearby surfaces only as the product directs, and keep repair materials away from controls and areas that are not being repaired.
Color can look different once it dries and under different lighting. A small test helps you judge the match, although a noticeable repair may still be visible on a large, prominent panel.
7. Apply the Repair Product and Let It Cure
Apply the color or finish using the kit’s directions for amount, layers, and drying between applications. Work within the damaged area and avoid building a thick ridge at the edge. If the kit includes a protective topcoat, use it only as instructed.
Allow the full cure time specified by the product before sitting on the seat or putting items on it. Dry to the touch does not necessarily mean ready for normal use. If the result is sticky, rubs off, or looks uneven after the stated cure period, stop and consult the product maker or an upholstery professional rather than adding more layers at random.
When to Call an Upholstery Professional
Professional help is worthwhile when the damage affects the structure of the seat or when a poor color match would be especially noticeable. An upholsterer can assess whether a panel can be repaired or should be replaced.
Seek help for a tear that goes through the material, an open seam, exposed padding, or widespread brittle leather. Also avoid DIY repairs around a seat-mounted side airbag or its deployment seam. Work in that area can affect how the airbag deploys, so use a qualified repairer familiar with the vehicle’s requirements.
If moisture has reached the padding, or the seat has persistent mold or odor, surface cleaning alone may not address the problem. A professional can inspect the affected materials and recommend an appropriate repair. Do not remove seat covers or disconnect seat electrical components without the correct vehicle-specific procedure.
How to Keep Restored Seats Looking Good
Regular, gentle care is easier on the upholstery than occasional aggressive cleaning. Remove grit promptly, wipe up spills using the vehicle maker’s guidance, and use products compatible with the material and finish.
Avoid sliding across the same bolster when entering or leaving if you can do so comfortably. Sharp objects, metal hardware, and heavy items can also scuff the finish. A sunshade or shaded parking can help limit direct sun exposure, but neither will reverse damage already present.
Check restored areas periodically for wear or color transfer. Follow the repair product’s maintenance instructions, since a newly applied finish may have different care requirements from the original upholstery. Do not add protectants or cleaners until the repair product says the finish is ready for them.
Conclusion
To restore leather car seats, first identify the upholstery, then vacuum and clean it gently with a compatible product. Reassess the dry surface before deciding whether a small finish repair is needed. Leave tears, damaged seams, and work near seat airbags to a qualified upholstery professional.
Frequently Asked Questions
Can leather car seats be changed to a different color?
A color change may be possible, but it is more demanding than touching up a worn patch. Coverage, adhesion, and the appearance around seams and perforations depend on the materials and products used. Ask an automotive upholstery specialist about the likely result before committing to a full-seat color change.
How can I remove an indentation left by a child seat?
Start by removing the child seat and giving the upholstery time to return to shape. Some marks may remain if the material or padding has been compressed for a long period. Avoid applying concentrated heat or forcing the leather into shape; an upholsterer can assess a persistent indentation.
Can I use a seat cover after repairing leather?
Yes, once the repair product has fully cured and its instructions permit normal use. Make sure the cover is compatible with the vehicle’s seat-mounted airbags and does not obstruct controls or other seat features. A cover that traps moisture or rubs against the repair may cause additional wear.
Is it better to repair or replace a damaged leather seat panel?
A small area of surface wear may be a candidate for repair, while a split, badly worn panel, or damaged seam may need replacement. The best choice depends on the condition of the surrounding upholstery and the desired appearance. An upholsterer can inspect the seat and explain which options are practical.