A burnt out headlight or taillight bulb is a small problem that carries real consequences, from reduced visibility at night to a possible traffic stop. Roughly one in five vehicles on the road has at least one improperly functioning headlight, according to data cited by the National Highway Traffic Safety Administration on nighttime visibility, which underscores how easily this kind of maintenance gets overlooked.
Replacing either a headlight or taillight bulb is usually a task most drivers can complete in under fifteen minutes with no special tools beyond gloves and possibly a screwdriver. This guide covers how to replace headlight bulbs, how to replace taillight bulbs, the different bulb types available, and the handful of details that trip people up on both jobs.
How Do You Know Which Bulb Type Your Car Needs?
The correct bulb type is listed in your owner’s manual, and it’s specific to your vehicle’s exact year, make, and model. Most auto parts retailers also offer online lookup tools where entering your vehicle’s details returns the correct bulb type automatically, which is often faster and more reliable than searching a printed manual.
Headlights and taillights frequently use different bulb types even on the same vehicle, and some models use different bulbs for low beam, high beam, and daytime running lights within the same headlight housing. Confirming the exact bulb before buying avoids a return trip to the store mid-project, and it also prevents installing a bulb with the wrong wattage, which on some newer vehicles can trigger a dashboard warning light even if the bulb technically fits.
What Are the Different Types of Headlight Bulbs?
Halogen bulbs remain the most common and affordable option, using a heated filament similar to a traditional incandescent bulb, though they produce less light per watt than newer alternatives. HID, or high-intensity discharge, bulbs use an electrical arc rather than a filament, producing a noticeably brighter and often bluish-white light, though they typically require a compatible ballast rather than a simple bulb swap. LED headlight bulbs have become increasingly common as factory equipment and aftermarket upgrades, offering longer lifespan and lower power draw, though not every LED bulb is a plug-and-play replacement for every vehicle’s factory housing.
Knowing which type your vehicle currently uses matters before shopping for a replacement, since swapping bulb technology entirely, such as installing an LED bulb into a housing designed for halogen, can sometimes cause beam pattern issues or dashboard errors on certain vehicles.
How Do You Replace a Headlight Bulb?
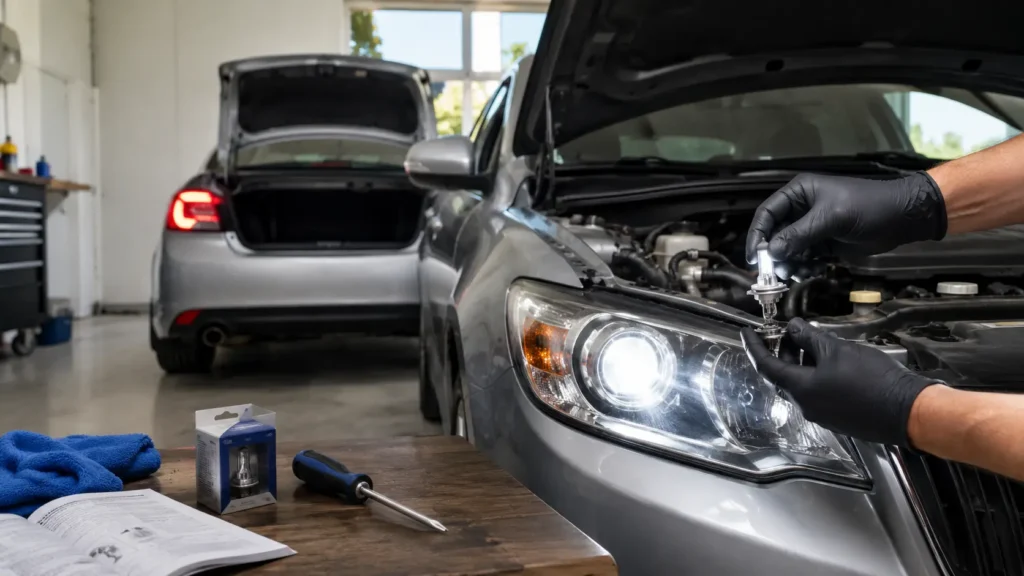
Replacing a headlight bulb means accessing the bulb from behind the headlight housing, usually through the engine bay, and swapping it without touching the new glass with bare fingers. Start by turning off the vehicle and putting on nitrile or similar gloves before handling any bulb.
Locate the headlight housing from the engine bay side, which may require unlatching or unscrewing a small access panel depending on the vehicle. Disconnect the electrical connector from the back of the old bulb by pulling on the tab rather than the wires themselves. Twist the old bulb counterclockwise to release it from the housing, then pull it straight out. Insert the new bulb into the same socket, aligning the locking tabs or grooves, and secure it with the retaining clip or locking ring. Reconnect the electrical connector, then turn on the headlights before closing the hood to confirm the new bulb works correctly.
How Do You Replace a Taillight Bulb?
Replacing a taillight bulb typically means accessing the bulb assembly from inside the trunk or cargo area rather than from outside the vehicle. Open the trunk and locate the back of the taillight assembly, which usually has a removable panel or a few screws holding it in place.
Remove the screws or panel to access the bulb sockets directly. Turn the specific bulb socket counterclockwise to release it from the assembly, then pull the old bulb straight out of the socket. Push the new bulb into the same socket position, then turn the socket clockwise to lock it back into the assembly. Reposition and reinstall the access panel or screws, then test the taillights, brake lights, and turn signals before closing the trunk.
Should You Replace Both Bulbs at the Same Time?
Yes, replacing both bulbs in a pair at the same time is generally recommended, even if only one has burnt out. Bulbs installed at the same time tend to wear at a similar rate, and manufacturer data on halogen bulb life typically shows a fairly tight failure window once bulbs pass a certain number of operating hours, meaning a second failure often follows within weeks or months of the first.
Replacing both together also keeps brightness and color temperature matched on each side, which matters for both appearance and for other drivers correctly judging your vehicle’s width and distance at night. A mismatched pair, one dim and aging alongside one bright and new, can actually make it harder for oncoming drivers to judge your vehicle’s position accurately.
Why Shouldn’t You Touch Halogen Bulb Glass With Bare Hands?
Touching halogen bulb glass with bare fingers leaves behind oils that can cause the bulb to fail prematurely once it heats up during use. The oil creates a hot spot on the glass surface, and the uneven heating can lead to cracking or significantly shortened bulb life, sometimes reducing a bulb’s expected lifespan considerably compared to one installed without contamination.
Wearing gloves or handling the bulb only by its base solves this easily, and if the glass is accidentally touched, wiping it clean with rubbing alcohol before installation removes the residue and reduces the risk of early failure. LED bulbs don’t carry this same specific risk, since they don’t rely on a heated glass filament, though keeping any bulb’s optical surfaces clean is still good practice for consistent light output.
What Should You Check After Installing a New Bulb?
Testing the new bulb immediately after installation confirms the connection is secure and the bulb itself is functioning before you close everything back up. Turn on the corresponding light, whether headlight, taillight, brake light, or turn signal, and visually confirm it’s working as expected.
A bulb that flickers, doesn’t light up at all, or triggers a dashboard bulb warning after installation usually points to either a loose connector, a bulb inserted incorrectly, or occasionally a bulb that was defective out of the box. Reseating the connector fully and double-checking the bulb is locked into position resolves most of these issues without needing a second replacement bulb. On vehicles with automatic bulb monitoring systems, a persistent warning even after a confirmed working bulb can sometimes indicate the system needs to be reset through the vehicle’s settings menu rather than a hardware problem.
How Often Do Headlight and Taillight Bulbs Typically Need Replacing?
Standard halogen bulbs generally last several years under normal use, though exact lifespan varies significantly based on driving conditions, vibration exposure, and how often the vehicle is driven at night. LED bulbs, by contrast, are often rated for a substantially longer service life, which is part of why they’ve become increasingly common as factory equipment on newer vehicles.
Frequent short trips, rough roads, and extended nighttime driving all tend to shorten bulb lifespan compared to primarily daytime highway driving, since both vibration and total operating hours contribute to filament wear in halogen bulbs specifically.
Conclusion
Replacing a headlight or taillight bulb is one of the simplest vehicle maintenance tasks and can usually be completed in less than 20 minutes with basic tools. Choosing the correct replacement bulb, handling it properly, and testing the lights before driving helps ensure reliable performance and safe nighttime visibility. If a new bulb still doesn’t work or bulbs fail repeatedly, the problem may involve the vehicle’s wiring, fuse, or charging system rather than the bulb itself. Performing this small repair as soon as a bulb burns out improves road safety, helps you comply with traffic laws, and keeps your vehicle visible to other drivers in all driving conditions.
Frequently Asked Questions
How long does it take to replace a headlight or taillight bulb?
Most headlight and taillight bulb replacements take 10 to 20 minutes. The exact time depends on your vehicle’s design. Some cars provide easy access behind the light housing, while others require removing trim panels, the battery, or parts of the bumper before you can reach the bulb.
Can I replace a headlight or taillight bulb without any tools?
Yes, many vehicles allow bulb replacement without tools. Some headlight and taillight assemblies use twist-lock sockets or retaining clips that can be removed by hand. However, certain models require a screwdriver or socket wrench to remove an access panel or the entire light assembly.
Why doesn’t my new headlight or taillight bulb work after installation?
If your new bulb doesn’t work immediately, the most common causes are:
- A loose electrical connector
- The bulb is not fully seated in the socket
- The wrong replacement bulb was installed
- A blown fuse
- A defective new bulb
Double-check the connector, confirm the correct bulb type, and inspect the related fuse before replacing the bulb again.
Is it legal to drive with a burned-out headlight or taillight?
In most U.S. states, driving with a non-functioning headlight or taillight is illegal and may result in a traffic citation. More importantly, a burned-out light reduces your visibility and makes it harder for other drivers to see your vehicle, especially at night or during bad weather. Replacing the bulb promptly improves both safety and legal compliance.
Can I replace a halogen headlight bulb with an LED bulb?
Sometimes, but not every vehicle is compatible with LED replacement bulbs. While the installation process is often similar, LED bulbs may require additional components, such as CAN bus adapters or cooling systems, and some factory halogen housings cannot produce the correct beam pattern with LED upgrades. Always verify compatibility with your vehicle before switching bulb technologies.
Why do my headlight bulbs keep burning out?
Repeated headlight bulb failures often indicate an underlying electrical problem rather than poor-quality bulbs. Common causes include:
- An overcharging alternator
- Voltage fluctuations
- Corroded electrical connectors
- Moisture inside the headlight housing
- Excessive vibration from loose mounting
If multiple bulbs fail within a short period, have the charging system and wiring inspected before installing another replacement.
Should I replace both headlight or taillight bulbs at the same time?
Yes. Replacing bulbs in pairs is recommended because both bulbs usually experience similar wear. Installing two new bulbs provides more consistent brightness, matching color temperature, and balanced nighttime visibility, while also reducing the chance that the second bulb will fail shortly after the first.
Can touching a halogen bulb with bare hands damage it?
Yes. Oils from your skin can create hot spots on the glass, causing a halogen bulb to overheat and fail prematurely. Always handle halogen bulbs by the base or wear clean gloves. If you accidentally touch the glass, clean it with rubbing alcohol before installation.