Replacing brake pads is one of the more approachable DIY repairs a car owner can take on, rated by most repair guides as a moderate difficulty job that an average home mechanic can complete in roughly 45 minutes to two hours per axle. It’s also one of the more financially worthwhile repairs to learn, since labor cost at a shop often makes up a significant portion of the total bill for a job that mainly requires patience rather than specialized skill.
This guide covers how to recognize worn brake pads, the exact tools and steps involved in replacing them safely, how front and rear pads differ, and the details that matter most for getting the job right the first time.
How Do You Know When Brake Pads Need Replacing?
Squealing, grinding, or a high-pitched whining sound when braking are the clearest audible signs that brake pads need attention. These sounds often come from a built-in metal wear indicator designed specifically to make noise once the pad material grows thin, alerting the driver before the problem becomes serious.
Brake pads are generally considered due for replacement once they wear down to less than a quarter inch of remaining thickness, a benchmark echoed consistently across manufacturer service guides and independent repair resources. Beyond sound, a soft or spongy brake pedal, visible thinning when looking through the wheel spokes, or the car pulling to one side during braking are additional signs worth investigating.
What Tools and Materials Do You Need?
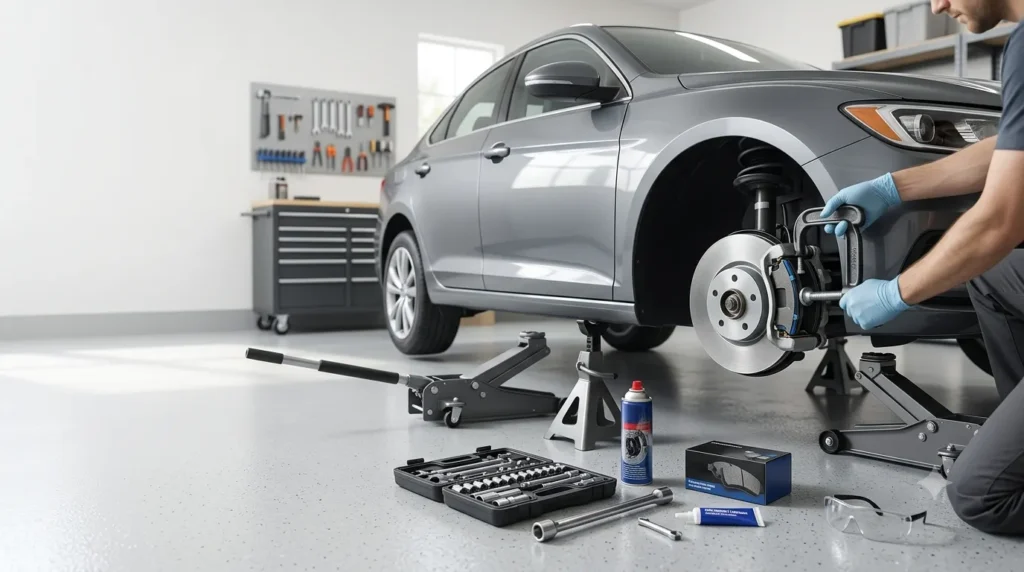
Replacing brake pads requires a car jack and jack stands, a socket set and ratchet, a lug wrench, a C-clamp or brake caliper tool, a flathead screwdriver, brake cleaner spray, new brake pads and any included hardware, anti-squeal brake lubricant, and gloves and safety glasses. Wheel chocks are also worth having on hand to secure the wheels that remain on the ground while you work.
Buying pads specifically matched to your vehicle’s make, model, and year, rather than a generic universal fit, ensures proper contact with the rotor and correct function of any built-in wear sensors your vehicle may have.
How Do You Prepare the Vehicle Safely?
Preparing the vehicle safely means parking on a flat, stable surface, engaging the parking brake, and placing wheel chocks behind the tires that will stay on the ground throughout the job. Working on an incline or soft surface significantly increases the risk of the vehicle shifting while it’s raised.
Loosen the lug nuts slightly while the vehicle is still fully on the ground, since the tire’s resistance against the pavement makes this far easier than trying to loosen them once the wheel is off the ground and free to spin. Only after loosening the lug nuts should you lift the vehicle with the jack and secure it on a jack stand rated for its weight, never relying on the jack alone to hold the vehicle up while you work underneath or near it.
How Do You Remove the Wheel and Access the Brake Caliper?
Removing the wheel means finishing the lug nut removal once the vehicle is safely supported on the jack stand, exposing the brake caliper and rotor. Pull the wheel straight off and set it aside in a spot where it won’t roll or become a tripping hazard.
With the wheel off, the brake caliper, the component that houses the pads and clamps them against the rotor, becomes fully visible. Locate the caliper bolts, typically found on the back side of the caliper, and use a socket or wrench to remove them.
How Do You Remove the Old Brake Pads?
Removing the old brake pads means carefully sliding the caliper off the rotor once its mounting bolts are out, without letting it hang by the flexible brake hose. Support the caliper temporarily with a bungee cord or a length of wire hooked to the suspension spring, since the brake hose isn’t designed to bear the caliper’s weight and can be damaged if left dangling.
Slide the old brake pads out of the caliper bracket, and remove any retaining clips or shims that held them in place, since these often get reused or replaced alongside the pads depending on the kit. Clean the caliper bracket and the rotor surface thoroughly with brake cleaner spray, removing built-up dust and grime before installing anything new, since a clean mounting surface helps the new pads seat correctly.
How Do You Install the New Brake Pads?
Installing new brake pads means seating them into the caliper bracket in the same orientation as the old ones, using any new retaining clips or shims provided with the kit. Applying a thin layer of anti-squeal brake lubricant to the back of the pads, where they contact the caliper piston and bracket, helps reduce the vibration that often causes brake noise after a pad replacement.
Before sliding the caliper back over the new pads, use a C-clamp or a dedicated caliper tool to slowly compress the caliper piston back into its housing, since the piston extends outward as the old, thinner pads wear down and won’t have room for the new, thicker pads otherwise. Carefully slide the caliper back into position over the new pads and onto the rotor, then reinsert and tighten the caliper bolts to the manufacturer’s specified torque.
How Do You Reinstall the Wheel and Finish the Job?
Reinstalling the wheel means placing it back onto the hub, then threading the lug nuts on by hand before using any tools, which helps avoid cross-threading. Lower the vehicle back to the ground using the jack, removing the jack stand only once the car is safely supported, then tighten the lug nuts fully in a star or crisscross pattern for even, balanced torque across the wheel.
After the wheel is fully reinstalled, pump the brake pedal several times with the engine off before driving, since the new pads sit closer to the rotor than the piston expects immediately after a compression reset, and pumping the pedal restores normal pedal feel before you actually need to stop the car.
What Does It Mean to Bed In New Brake Pads?
Bedding in new brake pads means performing a series of controlled acceleration and braking cycles that transfer a thin, even layer of pad material onto the rotor surface, which is essential for proper braking performance. Skipping this step can leave new pads performing inconsistently or generating excessive noise for much longer than necessary.
A typical bedding-in process involves accelerating to a moderate speed and braking firmly, though not to a complete panic stop, several times in succession, allowing the brakes to cool slightly between each cycle rather than repeating them back to back without pause. Many pad manufacturers include specific bedding-in instructions with their product, and following those exact steps, rather than a generic approach, gives the most consistent results for that particular pad compound.
How Do Front and Rear Brake Pads Differ?
Front brake pads generally wear faster than rear pads, since a vehicle’s weight shifts forward under braking, placing more of the stopping workload on the front wheels. This means front pads on many vehicles need replacement noticeably more often than rear pads, even though both sets are exposed to the same total mileage.
Rear brakes on some vehicles use a drum brake design instead of disc brakes with pads, particularly on older or more budget-oriented models, which changes the replacement process considerably and involves springs, shoes, and a different set of tools rather than a caliper and pad. Some rear disc brake systems also incorporate the parking brake mechanism directly into the caliper, which adds an extra step of retracting the parking brake mechanism before the caliper can be removed, a detail worth confirming for your specific vehicle before starting the job.
How Much Money Can DIY Brake Pad Replacement Save?
DIY brake pad replacement typically saves the most money on labor, since the parts themselves, pads and any accompanying hardware, cost roughly the same whether you install them yourself or a shop does. Labor charges for brake pad replacement at a shop often make up a substantial share of the total invoice, since the job requires lift time and technician labor even though the parts cost is relatively modest.
For a driver comfortable with basic tools and willing to invest an afternoon, replacing pads on both axles over the vehicle’s ownership period can add up to meaningful savings compared to paying shop labor rates each time. That said, the savings should be weighed against the value of your own time and comfort level working under a raised vehicle, since brake work directly affects safety and isn’t the place to cut corners if you’re not fully confident in the process.
Common Mistakes People Make When Replacing Brake Pads
A handful of avoidable errors turn an otherwise straightforward job into a comeback repair.
- Letting the caliper hang by the brake hose instead of supporting it separately, which can damage the hose over time
- Skipping the anti-squeal lubricant on the pad backing, leading to persistent brake noise after the job is done
- Forgetting to compress the caliper piston fully before attempting to slide the caliper back over the new, thicker pads
- Not pumping the brake pedal before driving, resulting in a dangerously long initial pedal travel
- Skipping the bed-in process entirely, which can leave new pads underperforming or noisy for an extended break-in period
Most of these mistakes come from rushing the final steps after the more physically demanding part of the job, removing the old pads, feels complete.
Conclusion
Replacing your own brake pads is one of the most practical and cost-effective DIY car maintenance jobs you can learn. With the right tools, proper safety precautions, and careful attention to each step, you can restore reliable braking performance while saving a significant amount on labor costs. Taking the time to inspect the brake rotors, install the hardware correctly, torque all fasteners to specification, and properly bed in the new brake pads helps ensure quiet operation, consistent stopping power, and longer-lasting brake components. If you ever discover excessive rotor damage, seized brake components, brake fluid leaks, or feel uncertain about any part of the repair, it’s always safer to have the braking system inspected by a qualified technician. Done correctly, a brake pad replacement improves both your vehicle’s performance and your confidence behind the wheel.
Frequently Asked Questions
Is replacing your own brake pads difficult?
Replacing brake pads is generally considered a moderate-difficulty DIY repair. Most repair guides rate it around 2 out of 5 on common wrench-difficulty scales. If you have basic hand tools, follow the correct safety procedures, and work carefully, many first-time DIY mechanics can successfully replace brake pads in about one to two hours per axle.
How long does it take to replace brake pads?
Most DIY brake pad replacements take 45 minutes to 2 hours per axle. The exact time depends on your vehicle’s brake design, whether the caliper bolts come off easily, and your level of experience. The first brake job usually takes longer than future replacements.
Do you need to replace brake rotors when replacing brake pads?
No, not always. Brake rotors only need replacement if they are below the manufacturer’s minimum thickness, heavily scored, warped, cracked, or otherwise damaged. If the rotors remain within specifications, they can often be resurfaced or reused with a new set of brake pads after inspection.
Why are my new brake pads squealing?
New brake pads may squeal because the anti-squeal brake lubricant wasn’t applied correctly, the bedding-in procedure wasn’t completed, or the brake hardware wasn’t installed properly. Mild noise during the first few miles can be normal, but persistent squealing should be inspected.
Can you drive immediately after replacing brake pads?
Yes, but only after taking two important steps. First, pump the brake pedal several times before moving the vehicle to restore normal brake pressure. Second, complete the recommended bedding-in procedure so the new pads and rotors develop proper contact. Avoid aggressive braking until the pads are fully bedded in.
Why do front brake pads wear out faster than rear brake pads?
Front brake pads typically wear faster because most vehicles transfer their weight toward the front during braking. This causes the front brakes to perform the majority of the stopping work, resulting in faster pad wear. This is a normal characteristic of most passenger vehicles.