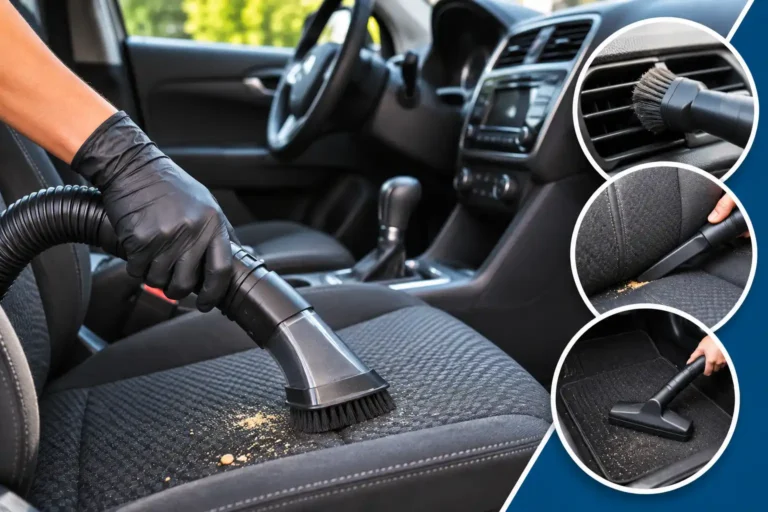
The best way to vacuum a car is to remove loose items and floor mats, work from the upper surfaces down, and finish with the carpet and seat gaps. Use a soft brush on delicate surfaces and a crevice tool where the floor nozzle cannot reach.
For many drivers, vacuuming every two to four weeks is a practical starting point. Cars carrying children, pets, or muddy gear may need attention weekly, while a lightly used car may stay clean for a month or longer. Adjust the schedule to the debris you actually see rather than treating an interval as a rule.
What You Need to Vacuum a Car
A household vacuum with a hose can handle routine interior cleaning. A wet/dry shop vacuum is another option if you already own one. The attachments and access they provide matter more than buying a machine specifically labeled for cars.
Gather these supplies before starting:
- A vacuum with a hose and the filter recommended by its manufacturer.
- A crevice tool for seat gaps, rails, and edges.
- A soft brush attachment for textured trim and vents.
- An upholstery or small floor attachment for seats and carpet.
- A soft detailing brush for loosening debris in tight seams.
- A trash bag and a container for belongings.
- A rubber pet-hair tool if fur remains embedded in carpet.
An extension cord may be useful for a corded vacuum. Keep the plug and connections dry, and follow the vacuum and cord manufacturers’ instructions. A cordless vacuum can be convenient where outlets are far away, but check that its charge and dust-bin capacity suit the job.
Prepare the Interior Before Vacuuming
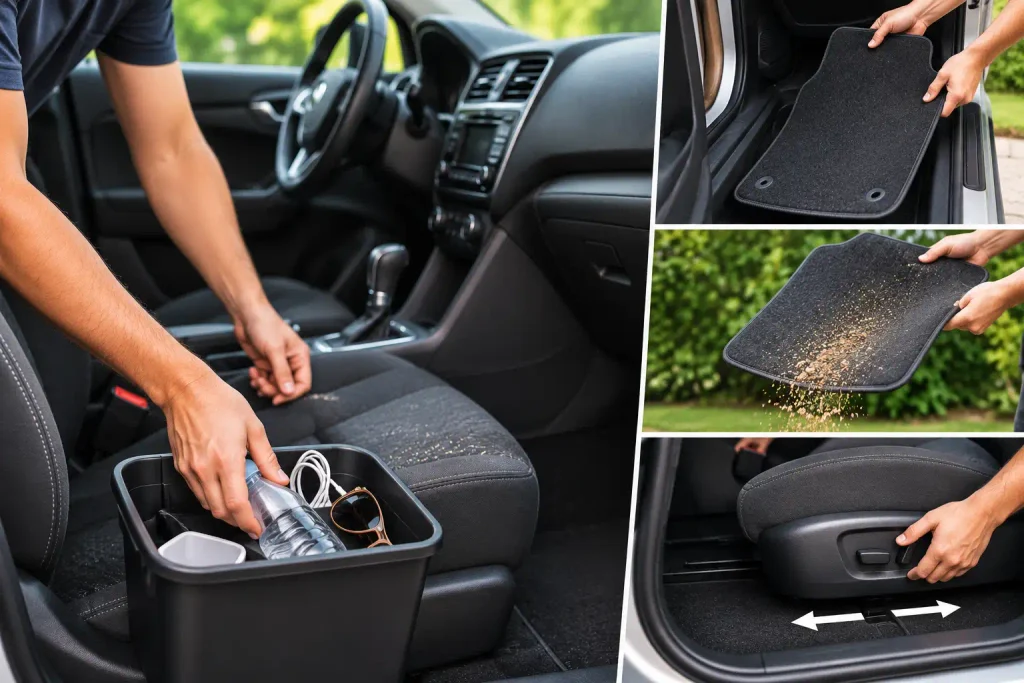
Park somewhere you can open the doors and reach both sides of the cabin. Turn the vehicle off, gather loose belongings, and remove trash, coins, and other objects that could clog or damage the vacuum.
Take out removable floor mats and set them aside. Shake them outdoors, away from people and other vehicles. Check that carpet and upholstery are dry before using an ordinary dry vacuum. For a wet spill, follow the vacuum manufacturer’s wet-pickup instructions and configuration instead of assuming the machine can handle liquid.
Move the front seats to expose the floor, using the vehicle’s normal seat controls. Look before reaching under a seat: wiring, connectors, and seat mechanisms can be vulnerable to snagging. Do not disconnect or pull on them.
How to Vacuum a Car Step by Step
Work from higher surfaces toward the floor so loosened dust does not fall onto an area you have already cleaned. Make slow, overlapping passes rather than rushing over visible debris once.
1. Clean the dashboard, console, and vents
Use the soft brush attachment on the dashboard, console, cupholders, and other hard surfaces. A small detailing brush can loosen dust around buttons and vent openings while the vacuum collects it nearby.
Keep hard nozzle edges away from screens, glossy trim, and delicate controls. Avoid forcing a tool into vent slats or pressing hard on switches. For cupholders containing sticky residue, vacuum loose crumbs first; a suitable interior cleaner and cloth may still be needed afterward.
2. Vacuum the seats and seams
Use the upholstery attachment on cloth seats, working across the backrests and cushions. Run the crevice tool gently along stitching, folds, and the space between the seat and center console. A soft brush can help lift crumbs from seams before another pass.
For leather, vinyl, perforated upholstery, or fragile fabric, use a clean soft attachment and light pressure. Check the vehicle owner’s care instructions if the material is unfamiliar. Vacuuming removes loose grit, but it does not replace a cleaner appropriate for the upholstery.
3. Reach beneath and around the seats
Move each front seat backward to expose the front of the footwell, then forward to reach the rear. Use the crevice tool around the seat rails and along the carpet edges. A flashlight can help reveal objects before they enter the hose.
Avoid catching wires, connectors, or the edge of loose trim with the nozzle. Do not push the seat mechanism beyond its normal range. If an attachment cannot reach a spot safely, use a soft brush to draw debris into an accessible area rather than forcing the nozzle underneath.
4. Vacuum the carpet and footwells
Start at the outer edges and seams, then cover the open carpet with overlapping passes. Change direction on a second pass where grit remains trapped in the fibers. A gentle carpet brush can loosen embedded dirt, but avoid aggressive scrubbing on worn or delicate material.
Pay attention to the driver’s footwell and the area around the pedals. Remove debris without applying cleaner or dressing to the pedals. Check that nothing you have moved can interfere with pedal travel before driving.
5. Clean the floor mats separately
Vacuum both sides of carpet mats, concentrating on the areas where shoes rest. For rubber or all-weather mats, remove dry grit first; wash them separately if the mat manufacturer’s instructions permit it.
Let washed mats dry before reinstalling them. Put each mat in its correct position and secure it using the vehicle’s retention system where fitted. Check that the driver’s mat lies flat and does not obstruct the pedals. Never stack an additional mat over it unless the vehicle and mat instructions specifically permit it.
6. Finish with the cargo area and a final check
Remove loose cargo and vacuum the trunk or cargo floor, edges, and accessible corners. If the cargo area has a removable liner, clean underneath it only as far as the liner and vehicle instructions allow.
Empty the vacuum bin or replace the bag as needed, and inspect the filter according to the vacuum manufacturer’s directions. Return the seats and belongings to their normal positions. A finished interior should have no obvious loose grit in the footwells or seat seams, and all mats should be secure.
How Often Should You Vacuum Your Car?
Every two to four weeks is a reasonable starting schedule for a regularly used car. This is a housekeeping suggestion, not a manufacturer-prescribed interval. Vacuum sooner when crumbs, sand, or pet hair accumulate, and stretch the interval if the cabin remains clean.
| Driving situation | Practical starting schedule | What to watch for |
|---|---|---|
| Children, pets, or frequent passengers | About weekly | Food crumbs, fur, and dirt in rear seats |
| Regular commuting and occasional passengers | Every two to four weeks | Grit in footwells and debris beside seats |
| Light use with little dirt tracked inside | About monthly or as needed | Dust and debris collecting in seams |
| After a sandy, muddy, or debris-heavy trip | As soon as the dry debris is practical to remove | Grit under mats and around cargo |
A quick footwell and seat-gap cleanup between full sessions can be enough. Deal with a wet or sticky spill promptly using a method appropriate for the material; a dry vacuum alone will not remove the residue.
How to Choose a Vacuum and Attachments
Start with the equipment you already have. A hose, a narrow nozzle, and a soft brush are enough for most routine jobs. An additional purchase makes sense when your current vacuum cannot reach the car or does not have the right attachment.
A corded household vacuum avoids a battery recharge but needs a safe route to an outlet. A shop vacuum can be useful for larger cleanup jobs, although its bulk may make it less convenient to move around the cabin. A compact cordless model is easier to carry, but its bin and battery may need attention during a full interior cleanup.
For attachments, prioritize a crevice tool that fits between your seats and console without forcing it. A soft brush helps protect trim, while an upholstery nozzle covers broad fabric areas. Check attachment compatibility with your vacuum before purchasing; fittings are not universal.
Common Car Vacuuming Mistakes
Most missed spots come from poor access or rushing. A few precautions also help prevent damage to the vacuum and interior.
- Vacuuming around clutter: Remove coins, wrappers, and small belongings first so they do not block the hose or disappear into the bin.
- Using a dry vacuum on wet material: Follow the machine’s wet-pickup instructions, or address the spill by another suitable method.
- Dragging a hard nozzle across trim: Use a clean soft attachment and keep the nozzle edge away from screens and glossy surfaces.
- Scrubbing delicate upholstery: Start gently and check the vehicle’s care instructions before using a stiff brush.
- Forcing tools under seats: Look for wiring and connectors, and use a smaller attachment or brush instead.
- Reinstalling mats incorrectly: Secure each mat in its proper location and verify that the driver’s pedals move freely.
Ordinary vacuuming is not the right response to every mess. For extensive mold, unknown hazardous material, bodily fluids, or broken glass you cannot remove safely, avoid spreading the contamination and consult an appropriate professional. Follow the vacuum manufacturer’s instructions about materials the machine can collect.
A Simple Vacuuming Routine to Keep
For most cars, begin with a full vacuum every two to four weeks and adjust to the amount of dirt your passengers and activities bring in. Keep a crevice tool and soft brush with the vacuum so you can clean seams and footwells without improvising.
If you have limited time, clear the trash, remove and shake the mats, and focus on the driver’s footwell and seat gaps. Then schedule a more thorough pass when debris starts collecting elsewhere.
Frequently Asked Questions
These answers address common decisions about equipment and cleaning methods.
Can I use a regular household vacuum in my car?
Yes. A household vacuum with a hose and suitable attachments can clean a dry car interior. Make sure the cord reaches safely, use the correct filter, and keep the machine away from wet material unless its instructions specifically allow wet pickup.
Should I vacuum the car before wiping the interior?
Usually, yes. Vacuuming loose grit first reduces the debris you might move around with a cloth. After wiping, make a brief final pass if crumbs or dust have fallen onto the carpet.
How do I remove pet hair that a vacuum leaves behind?
Use a rubber pet-hair tool or a suitable soft brush to gather stubborn hair, then vacuum the loosened strands. Test the tool gently on an inconspicuous area first, especially on delicate upholstery, and avoid excessive rubbing.
Can I vacuum damp car carpet?
Do not use an ordinary dry vacuum on damp carpet unless the vacuum manufacturer explicitly permits it. If you have a wet/dry vacuum, follow its instructions for wet pickup and filter configuration, then address the moisture and its cause rather than leaving the carpet damp.
Why does the car still smell after vacuuming?
Vacuuming removes loose debris but may not remove the source of an odor, such as a spill in upholstery or moisture beneath a mat. Inspect likely areas and clean or dry them using methods suitable for the material. Persistent moisture or an unidentified odor may warrant professional help.