Tires and wheels are continuously exposed to heat, brake dust, moisture, and road contaminants, which can accelerate wear and reduce performance. Brake dust often contains fine metallic particles that bond to wheel surfaces, increasing the risk of corrosion over time. The National Highway Traffic Safety Administration highlights tire maintenance such as proper inflation and tread inspection as key factors in vehicle safety and crash prevention. Data from Michelin shows that regular rotation helps distribute wear more evenly, extending tire life. Consistent cleaning and protection reduce surface damage, maintain efficiency, and support long term durability under real driving conditions.
6 Types of Different Wheels and Tires
Different wheels and tire surfaces do not respond the same way to cleaners, brushes, or protectants. The finish on the wheel, the base material underneath, and the tire rubber itself all change how you should clean and protect them. SEMA’s Wheel Care Guide explains that chrome, painted, powder-coated, anodized, plastic-clad, multi-finish, and polished or uncoated wheels each have different surface behavior, so the safest care method starts with identifying what you are working on first.
1. Painted Wheels
Painted wheels are common because they can match modern body finishes well and are usually easier to maintain than raw metal surfaces. According to SEMA, painted wheels have a chemically bonded coating similar to body paint, and that coating may be clear coat, color coat, or powder coated. This means they should usually be cleaned with a finish-safe wheel cleaner rather than harsh products that can dull or strip the surface. A gentle approach keeps the coating looking even and helps the wheel stay easier to clean next time.
2. Alloy Wheels
Alloy wheels are popular because they are lightweight and widely used across everyday cars and performance vehicles. In practical care terms, the important point is that alloy wheels may be painted, polished, clear coated, or finished in other ways, so the visible surface matters more than the word alloy alone. SEMA’s guide also notes that different wheel finishes need different cleaners, with neutral pH products commonly suited to aluminum wheel cleaners. That is why two alloy wheels can need very different maintenance even if they look similar at first glance.
3. Chrome Wheels
Chrome wheels are chosen for their bright reflective look, but they need careful maintenance because the finish can show water marks, grime, and poor cleaning habits quickly. SEMA describes chrome as a decorative and protective finish created by electroplating, and says properly cared for chrome is highly resistant to corrosion and rust and can maintain its shine for years. The key is to use a cleaner made for chrome and to avoid aggressive scrubbing that can damage the finish or shorten that shine.
4. Steel Wheels
Steel wheels are strong, practical, and widely used, especially where durability and cost matter more than a show finish. Steel itself is an iron-carbon alloy, and worldsteel explains that steel contains less than 2 percent carbon along with small amounts of other elements. In wheel care, the main concern is often the finish on top of the steel rather than the steel itself, because paint and coatings help protect it from corrosion. Once that protective layer is damaged, cleaning and drying become even more important.
5. Powder-Coated and Clear-Coated Wheels
Powder-coated and clear-coated wheels are designed to add another layer of protection while giving the wheel a finished look. SEMA places powder coating under painted applications and explains that clear coat is a colorless layer that sits over the surface like body clear coat. This matters because coated wheels usually respond best to mild, finish-safe cleaning rather than aggressive polish or abrasive tools. A proper cleaner, soft agitation, and full drying are usually enough to keep these finishes looking sharp.
6. Tire Sidewalls and Rubber Composition
Tire sidewalls are not the same as wheel surfaces, so they should not be treated with the same products. Michelin describes tire maintenance as including inflation pressure, tread depth, visual condition, rotation, alignment, and balancing, which shows that tire care is more about safety and wear than shine alone. The sidewall should be cleaned gently so the rubber stays healthy and readable, especially around branding, size markings, and damage points. A tire that looks clean but is cracked, underinflated, or worn unevenly is still a tire that needs attention.
Segment of Wheel Cleaners, Acidic vs Non-Acidic
Wheel cleaners fall into different strength levels, and the finish should decide which one you choose. SEMA’s guide says high pH cleaners are typically labeled as wheel and tire cleaners, neutral pH cleaners are often labeled as aluminum wheel cleaners, and low pH cleaners are typically labeled as chrome wheel cleaners. That means wheel cleaner choice is not only about cleaning power. It is also about matching the chemical strength to the surface so the finish stays protected while dirt is removed effectively.
Tire Cleaners and Degreasers
Tire cleaners and degreasers are made to remove old dressing, road grime, and buildup from the rubber so the tire can look truly clean instead of just shiny on top. Michelin’s tire maintenance guidance makes clear that inspection and care matter because tires wear differently depending on where they sit on the vehicle, and clean surfaces make it easier to spot wear, cracks, or damage early.
- Removes old tire dressing and buildup
- Cleans deep into rubber pores
- Helps identify cracks, wear, and damage
- Prepares the surface for better dressing bonding
For deep cleaning, the best product is usually one that removes residue without leaving a slippery film behind. That gives dressing a better surface to bond to later.
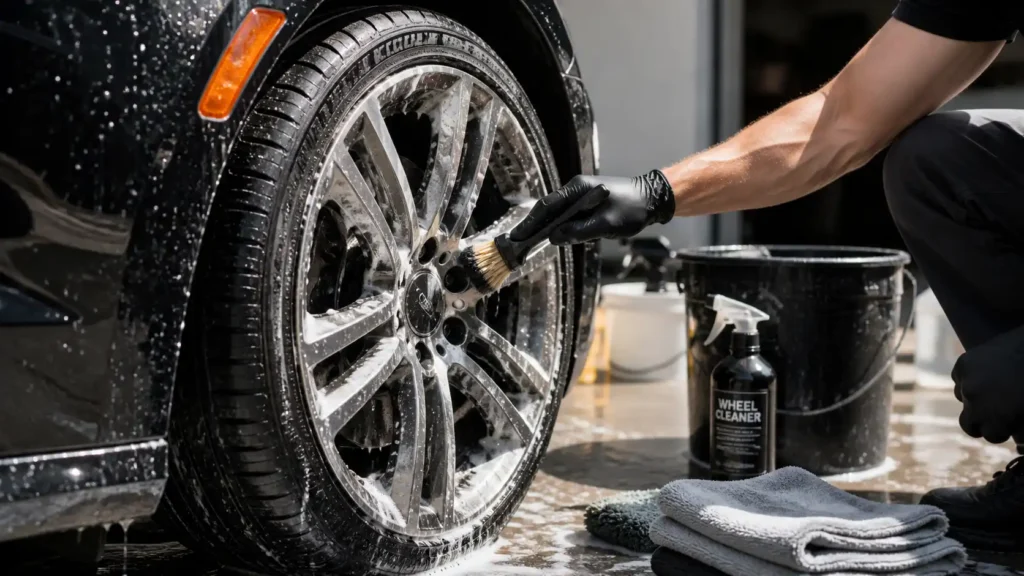
Brushes, Soft, Medium, and Barrel Brushes
Brushes matter because wheels have different zones, and each zone needs a different level of touch. SEMA recommends soft bristle wheel brushes or wash mitts for safe agitation and says the wheel should be rinsed thoroughly and dried completely after cleaning.
- Soft brushes for wheel faces and delicate finishes
- Medium brushes for general cleaning
- Barrel brushes for inner wheel areas
- Designed to reach tight spaces where brake dust builds up
A brush that is too aggressive can scratch the finish, so the safer choice is always the one that cleans without marking the surface.
Microfiber Towels and Drying Tools
Microfiber towels are useful because they lift moisture and residue without dragging grit across the surface as easily as rough materials can. SEMA recommends drying the wheel completely with a cloth after rinsing, and Michelin also says to dry wheels and tires well to help limit corrosion during storage.
- Absorbs water efficiently
- Reduces risk of scratches
- Prevents water spots and mineral marks
- Helps remove leftover residue
Drying is not just a finishing step. It helps prevent water spots, reduces mineral buildup, and keeps moisture from sitting in tight areas like lug nuts or edges.
Buckets, Grit Guards, and Wash Mitts
Buckets, grit guards, and wash mitts support safer washing by reducing how much dirt is carried back onto the wheel. SEMA’s advice to work carefully on a cool surface and agitate with soft materials fits well with a clean wash setup that keeps debris away from the finish.
- Grit guards trap dirt at the bottom of the bucket
- Wash mitts provide gentle cleaning action
- Separate bucket prevents cross-contamination
- Dedicated tools improve cleaning safety
A separate bucket for wheels is helpful because wheel contamination is often heavier than body paint contamination, especially around brake dust and road grime. Using dedicated tools for wheels also helps avoid cross-contamination when the same vehicle is being cleaned top to bottom.
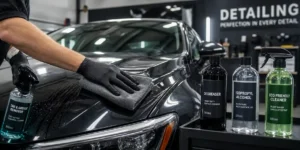
Wheel Sealants, Ceramic Coatings, and Tire Dressings
Protection products help the wheel and tire stay cleaner for longer after washing. SEMA recommends protecting the wheel surface with sealer or wax after cleaning, and Tire Rack lists ceramic protective coatings for wheels as stain and contaminant resistant.
- Wheel sealants add a protective layer
- Ceramic coatings offer longer-lasting resistance
- Tire dressings restore a dark, clean look
- Helps reduce UV damage and fading
For tires, dressings are used to restore a darker, finished look and to help slow fading, especially after UV exposure and heat. The most important rule is to match the protection to the surface, because wheel coatings, wheel sealants, and tire dressings are not interchangeable products.
Acidic vs Non-Acidic
| Cleaner Type | pH Level | Typical Labeling | Best Use Case |
|---|---|---|---|
| High pH Cleaners | Alkaline | Wheel and tire cleaners | Heavy dirt, grease, and road grime |
| Neutral pH Cleaners | Neutral | Aluminum wheel cleaners | Safe routine cleaning for sensitive finishes |
| Low pH Cleaners | Acidic | Chrome wheel cleaners | Removing stubborn brake dust and mineral deposits |
Step-by-Step Wheel Cleaning Process
Cleaning wheels the right way protects the finish while removing brake dust, road grime, and contaminants that build up quickly. SEMA recommends cleaning wheels on a cool surface, avoiding direct sunlight, and using a finish-safe cleaner followed by proper rinsing and drying to prevent damage and spotting.
Step 1: Pre-Rinse to Remove Loose Contaminants
Pre-rinsing removes loose dirt, sand, and debris before any physical contact is made with the wheel. This step reduces the risk of scratching because dry particles are washed away first instead of being dragged across the surface during scrubbing.
In real-world conditions, wheels collect brake dust and road particles that can act like abrasives. A steady stream of water helps loosen these particles so the cleaner can work more effectively afterward. This step may look simple, but it plays a big role in preventing swirl marks and surface damage.
Step 2: Select the Right Cleaner for Your Wheel Type
The right cleaner depends on the wheel finish, not just how dirty the wheel looks. SEMA explains that different pH levels are designed for different surfaces, with neutral cleaners often used for aluminum and balanced options for coated wheels.
Using a cleaner that is too strong can damage coatings or cause discoloration, especially on chrome or clear-coated wheels. A properly matched cleaner removes brake dust and grime while keeping the protective layer intact, which makes future cleaning easier and safer.
Step 3: Clean Wheel Faces, Spokes, and Lug Nuts
Wheel faces and spokes are the most visible areas, so they need careful cleaning with the right tools. Lug nuts and tight corners also collect dirt, which can build up over time if ignored.
Soft brushes or wash mitts are recommended because they clean without scratching. SEMA advises using gentle agitation rather than force, which means allowing the cleaner to do most of the work instead of scrubbing aggressively. This approach protects the finish and still achieves a thorough clean.
Step 4: Clean the Inner Barrel
The inner barrel is often the dirtiest part of the wheel because it is closer to brake components. Brake dust accumulates here quickly and can become harder to remove if left untreated.
A barrel brush helps reach deep areas that are not visible at first glance. Cleaning this section improves overall hygiene and reduces long-term buildup. It also helps maintain balance and reduces the risk of corrosive contaminants sitting inside the wheel.
Step 5: Use Safe Agitation Techniques
Safe agitation means using controlled pressure and the correct brush for each surface. SEMA highlights the use of soft bristle brushes and proper cleaning technique to avoid damaging wheel finishes.
Instead of scrubbing hard, it is better to let the cleaner dwell for a short time so it can break down dirt. Light brushing then lifts the contaminants away without harming the surface. This method is both effective and safer for long-term maintenance.
Step 6: Rinse Thoroughly
Rinsing removes all cleaner residue, loosened dirt, and chemical traces from the wheel. Any leftover cleaner can cause spotting or surface damage if it dries on the wheel.
A strong rinse ensures that all areas, including lug nuts and inner barrels, are free from residue. This step also prepares the wheel for drying, which is just as important as washing itself.
Step 7: Dry the Wheel Properly
Drying prevents water spots and protects the finish after cleaning. SEMA recommends drying wheels completely with a cloth, and proper drying also helps prevent mineral deposits from forming on the surface.
Air Dry vs Microfiber Drying
| Drying Method | Description | Key Benefits | Limitations |
|---|---|---|---|
| Air Drying | Air drying may seem convenient, but it often leaves water spots, especially in areas with mineral-rich water. | Easy and requires no tools | Can leave water spots and mineral marks |
| Microfiber Drying | Microfiber drying is more controlled and removes moisture before it can leave marks. Microfiber towels absorb water efficiently and reduce streaking. They also help reach tight areas where water tends to collect, such as around lug nuts and spokes. | Absorbs water efficiently, reduces streaking, reaches tight areas | Requires proper towels and effort |
Step 8: Prevent Water Spots
Water spots form when minerals are left behind after water evaporates. These spots can become harder to remove if they sit on the surface for a long time.
Drying immediately after rinsing reduces this risk. Using clean water and avoiding washing in direct sunlight also helps minimize spotting. This small step improves the final finish and keeps wheels looking clean for longer.
Step-by-Step Tire Cleaning Process
Tire cleaning focuses on removing dirt, old dressing, and road grime from rubber surfaces. Clean tires not only look better but also make it easier to inspect for cracks, uneven wear, and other safety concerns. NHTSA emphasizes regular inspection as part of tire safety and maintenance.
Step 1: Initial Tire Rinse and Debris Removal
The first step is rinsing the tire to remove loose dirt and surface debris. This prepares the tire for deeper cleaning and prevents dirt from spreading during scrubbing.
A proper rinse also helps the cleaner spread evenly across the surface. This improves cleaning efficiency and reduces the effort needed during scrubbing.
Step 2: Apply Tire Cleaner
Tire cleaner is applied directly to the sidewall to break down grime and old dressing. These products are designed to lift contaminants that water alone cannot remove.
Allowing the cleaner to sit briefly helps it penetrate buildup. This makes the next step, scrubbing, more effective and less aggressive on the rubber.
Step 3: Scrub for Deep Cleaning
Scrubbing removes embedded dirt from the tire surface. A dedicated tire brush works best because it can reach into the texture of the rubber.
Moderate pressure is enough when the cleaner is working properly. Over-scrubbing is not necessary and may wear down the surface over time. The goal is to remove dirt completely while keeping the rubber in good condition.
Step 4: Clean Whitewalls and Raised Lettering
Whitewalls and raised lettering require extra attention because they show dirt more easily. These areas often need repeated cleaning to restore their original look.
A focused cleaning approach with a suitable brush helps lift dirt from edges and grooves. Consistency is important because these areas tend to attract more visible grime over time.
Step 5: Final Rinse and Drying
The final rinse removes all remaining cleaner and loosened dirt from the tire. Just like wheels, any leftover residue can affect the finish and reduce the effectiveness of dressing.Drying helps prepare the tire for protection products. It also reduces the chance of water spots or uneven dressing application later.
5 Protection Methods for Wheels and Tires
Protection is the step that keeps wheels and tires cleaner for longer and reduces the effort needed during future washes. SEMA recommends applying sealants or wax after cleaning, while Tire Rack highlights that ceramic coatings can provide resistance against stains and contaminants.
1. Wheel Sealants and Synthetic Waxes
Wheel sealants and synthetic waxes create a protective layer on the surface. This layer helps repel dirt, brake dust, and water, making cleaning easier over time.
- Creates a protective barrier on the wheel surface
- Repels dirt, brake dust, and water
- Reduces how strongly contaminants stick
- Makes future cleaning easier and faster
- Helps preserve the wheel finish over time
A well-applied sealant can reduce how strongly contaminants stick to the wheel. This means less scrubbing is needed during future washes, which helps preserve the finish in the long run.
2. Ceramic Coatings for Long-Term Protection
Ceramic coatings offer a more durable form of protection compared to traditional sealants. They bond to the surface and create a strong barrier against contaminants.
- Provides long-lasting protection
- Forms a strong bonded layer on the surface
- Resists stains and environmental contaminants
- Withstands high heat from braking systems
- Reduces maintenance frequency over time
These coatings are known for their resistance to heat and chemical exposure. Since wheels are exposed to high temperatures from braking, this added durability makes ceramic coatings a popular choice for long-term care.
3. Tire Dressings, Water-Based vs Solvent-Based
Tire dressings are used to restore the deep black look of rubber and protect against fading. Water-based dressings are generally preferred for a more natural finish, while solvent-based options provide a shinier appearance.
- Restores deep black appearance of tires
- Protects rubber from drying and fading
- Water-based: natural, matte or satin finish
- Solvent-based: glossy, high-shine finish
- Enhances overall tire appearance
Choosing the right dressing depends on the desired look and maintenance routine. A properly applied dressing enhances appearance without leaving the tire overly greasy.
4. UV Protection and Anti-Fading Benefits
UV exposure is one of the main causes of tire fading and surface degradation. Protection products help block UV rays and slow down this process.
- Blocks harmful UV rays
- Prevents fading and discoloration
- Maintains tire flexibility and condition
- Keeps tires looking newer for longer
Over time, untreated tires may appear dull or gray. Regular use of protective products helps maintain color and flexibility, which contributes to both appearance and durability.
4. Application Techniques for Best Results
Applying protection products correctly ensures even coverage and better performance. Clean and dry surfaces are essential before applying any sealant or dressing.
- Always apply on clean, dry surfaces
- Use a proper applicator for even spread
- Apply thin, even layers for best bonding
- Avoid over-application to prevent streaking
- Allow proper curing or drying time
Using the right applicator helps spread the product evenly. Thin layers are usually more effective than heavy application, as they bond better and reduce the chance of streaking or sling.
Pro Tips to Keep Tires and Wheels Looking New
Keeping wheels and tires in top condition comes down to consistency and smart habits. Small improvements in your routine can deliver noticeable results over time.
Building a Consistent Cleaning Routine
A consistent cleaning routine is the easiest way to keep wheels and tires looking fresh without extra effort. When you clean regularly, dirt and brake dust do not get enough time to build up or stick strongly to the surface.
This means each wash becomes faster and safer. You do not need aggressive scrubbing, which helps protect the wheel finish over time. Instead of deep cleaning once in a while, light and regular cleaning keeps everything under control and easier to maintain.
Using Two-Bucket Wash Method
The two-bucket wash method is a simple technique that helps reduce the risk of scratches during cleaning. One bucket is filled with clean water, while the other is used to rinse off dirt from brushes or wash mitts.
This setup prevents dirty water from going back onto the wheel surface. It keeps your tools cleaner and reduces the chance of dragging brake dust or debris across the finish. For wheels with delicate coatings, this small change can make a big difference in long-term appearance.
Reapplying Protection Regularly
Protection products like sealants, coatings, and tire dressings wear off over time. Heat from braking, exposure to water, and road conditions slowly reduce their effectiveness.
Reapplying protection regularly helps maintain a strong barrier against dirt, grime, and UV exposure. It also keeps tires looking darker and wheels easier to clean. A simple habit of reapplying after a few washes can extend the life of both the finish and the overall appearance.
Proper Storage of Seasonal Wheels
Proper storage is important for maintaining wheels that are not used year-round. Seasonal wheels should always be kept in a clean and dry place to prevent moisture damage and surface corrosion.
Before storing, it is important to wash and dry both wheels and tires completely. Leaving dirt or moisture behind can lead to staining or long-term damage. A clean storage routine ensures the wheels stay in good condition and are ready to use when the season changes.
Frequently Asked Questions
How often should you clean tires and wheels?
Clean them every 1 to 2 weeks for regular driving.Frequent washing prevents brake dust and grime from building up. This keeps cleaning easier and protects the wheel finish over time.
What is the best way to clean wheels safely?
Use a finish-safe wheel cleaner with soft brushes. Let the cleaner break down dirt first, then gently agitate and rinse well. This method removes grime without scratching or damaging the surface.
Can I use one product for both tires and wheels?
No, use separate products for best results. Wheel cleaners target metal surfaces, while tire cleaners remove rubber buildup and old dressing. Using the right product improves cleaning and safety.
Do wheel sealants or ceramic coatings really work?
Yes, they help protect and keep wheels cleaner longer. They create a barrier that repels dirt, brake dust, and water. This reduces cleaning effort and helps maintain the finish.
How do you keep tires looking black and new?
Clean the tire fully, then apply a quality dressing.A proper dressing restores color and protects against fading. Regular application keeps the tire looking fresh and well-maintained.
Should you dry wheels after washing?
Yes, drying prevents water spots and marks.Leaving water to air dry can cause mineral stains. Using a microfiber towel gives a cleaner, spot-free finish.
What is the biggest mistake in tire and wheel care?
Letting dirt and brake dust sit too long.When buildup hardens, it becomes harder to remove and may damage the surface. Regular cleaning avoids this problem.
Is the two-bucket method necessary for wheels?
It is not required, but it is highly recommended.It helps keep dirt away from the surface during cleaning. This reduces the risk of scratches and keeps the process safer..
Conclusion
Tire and wheel care is a combination of proper cleaning, smart protection, and consistent maintenance. Each step plays a role in preserving both appearance and performance.
Simple habits such as regular washing, correct product use, and monthly inspections can extend tire life and protect wheel finishes. Backed by guidance from organizations like National Highway Traffic Safety Administration and manufacturers like Michelin, these practices are proven to support safer and more efficient driving.When done consistently, tire and wheel care becomes easier over time. The result is a vehicle that not only looks better but also performs more reliably on the road.